> ## Documentation Index
> Fetch the complete documentation index at: https://infisical.com/docs/llms.txt
> Use this file to discover all available pages before exploring further.
# Agent Proxy quickstart
> Broker your first credential to an agent through the Infisical Agent Proxy.
This tutorial takes you from an Infisical project to an agent making authenticated API calls through the Agent Proxy, with real credentials it never sees.
## Before you begin
To follow along, you'll need:
* An Infisical Secrets Management project.
* A GitHub account (this guide's running example) or any other API you'd rather broker. The steps are the same either way.
* Two hosts in the same private network: one for the agent proxy and one for the agent. The agent host must be able to reach the proxy on its port (`17322` by default).
* The [Infisical CLI](/docs/cli/overview) installed on both the proxy host and the agent host.
* Optional: [GitHub's `gh` CLI](https://cli.github.com/) on the agent host, for the recommended verification in step 7. A `curl` fallback is provided, so this is not required.
## 1. Add a secret
First, get a GitHub personal access token to broker:
1. Go to [GitHub → Settings → Developer settings → Personal access tokens → Fine-grained tokens](https://github.com/settings/personal-access-tokens).
2. Click **Generate new token**, give it a name, set an expiration, and choose the resource owner.
3. Leave the permissions at their defaults. The verification in step 7 calls `GET /user`, which any valid token can reach, so no permissions are needed here; later, grant only what your agent actually does.
4. Click **Generate token** and copy the `github_pat_…` value. GitHub only shows it once.
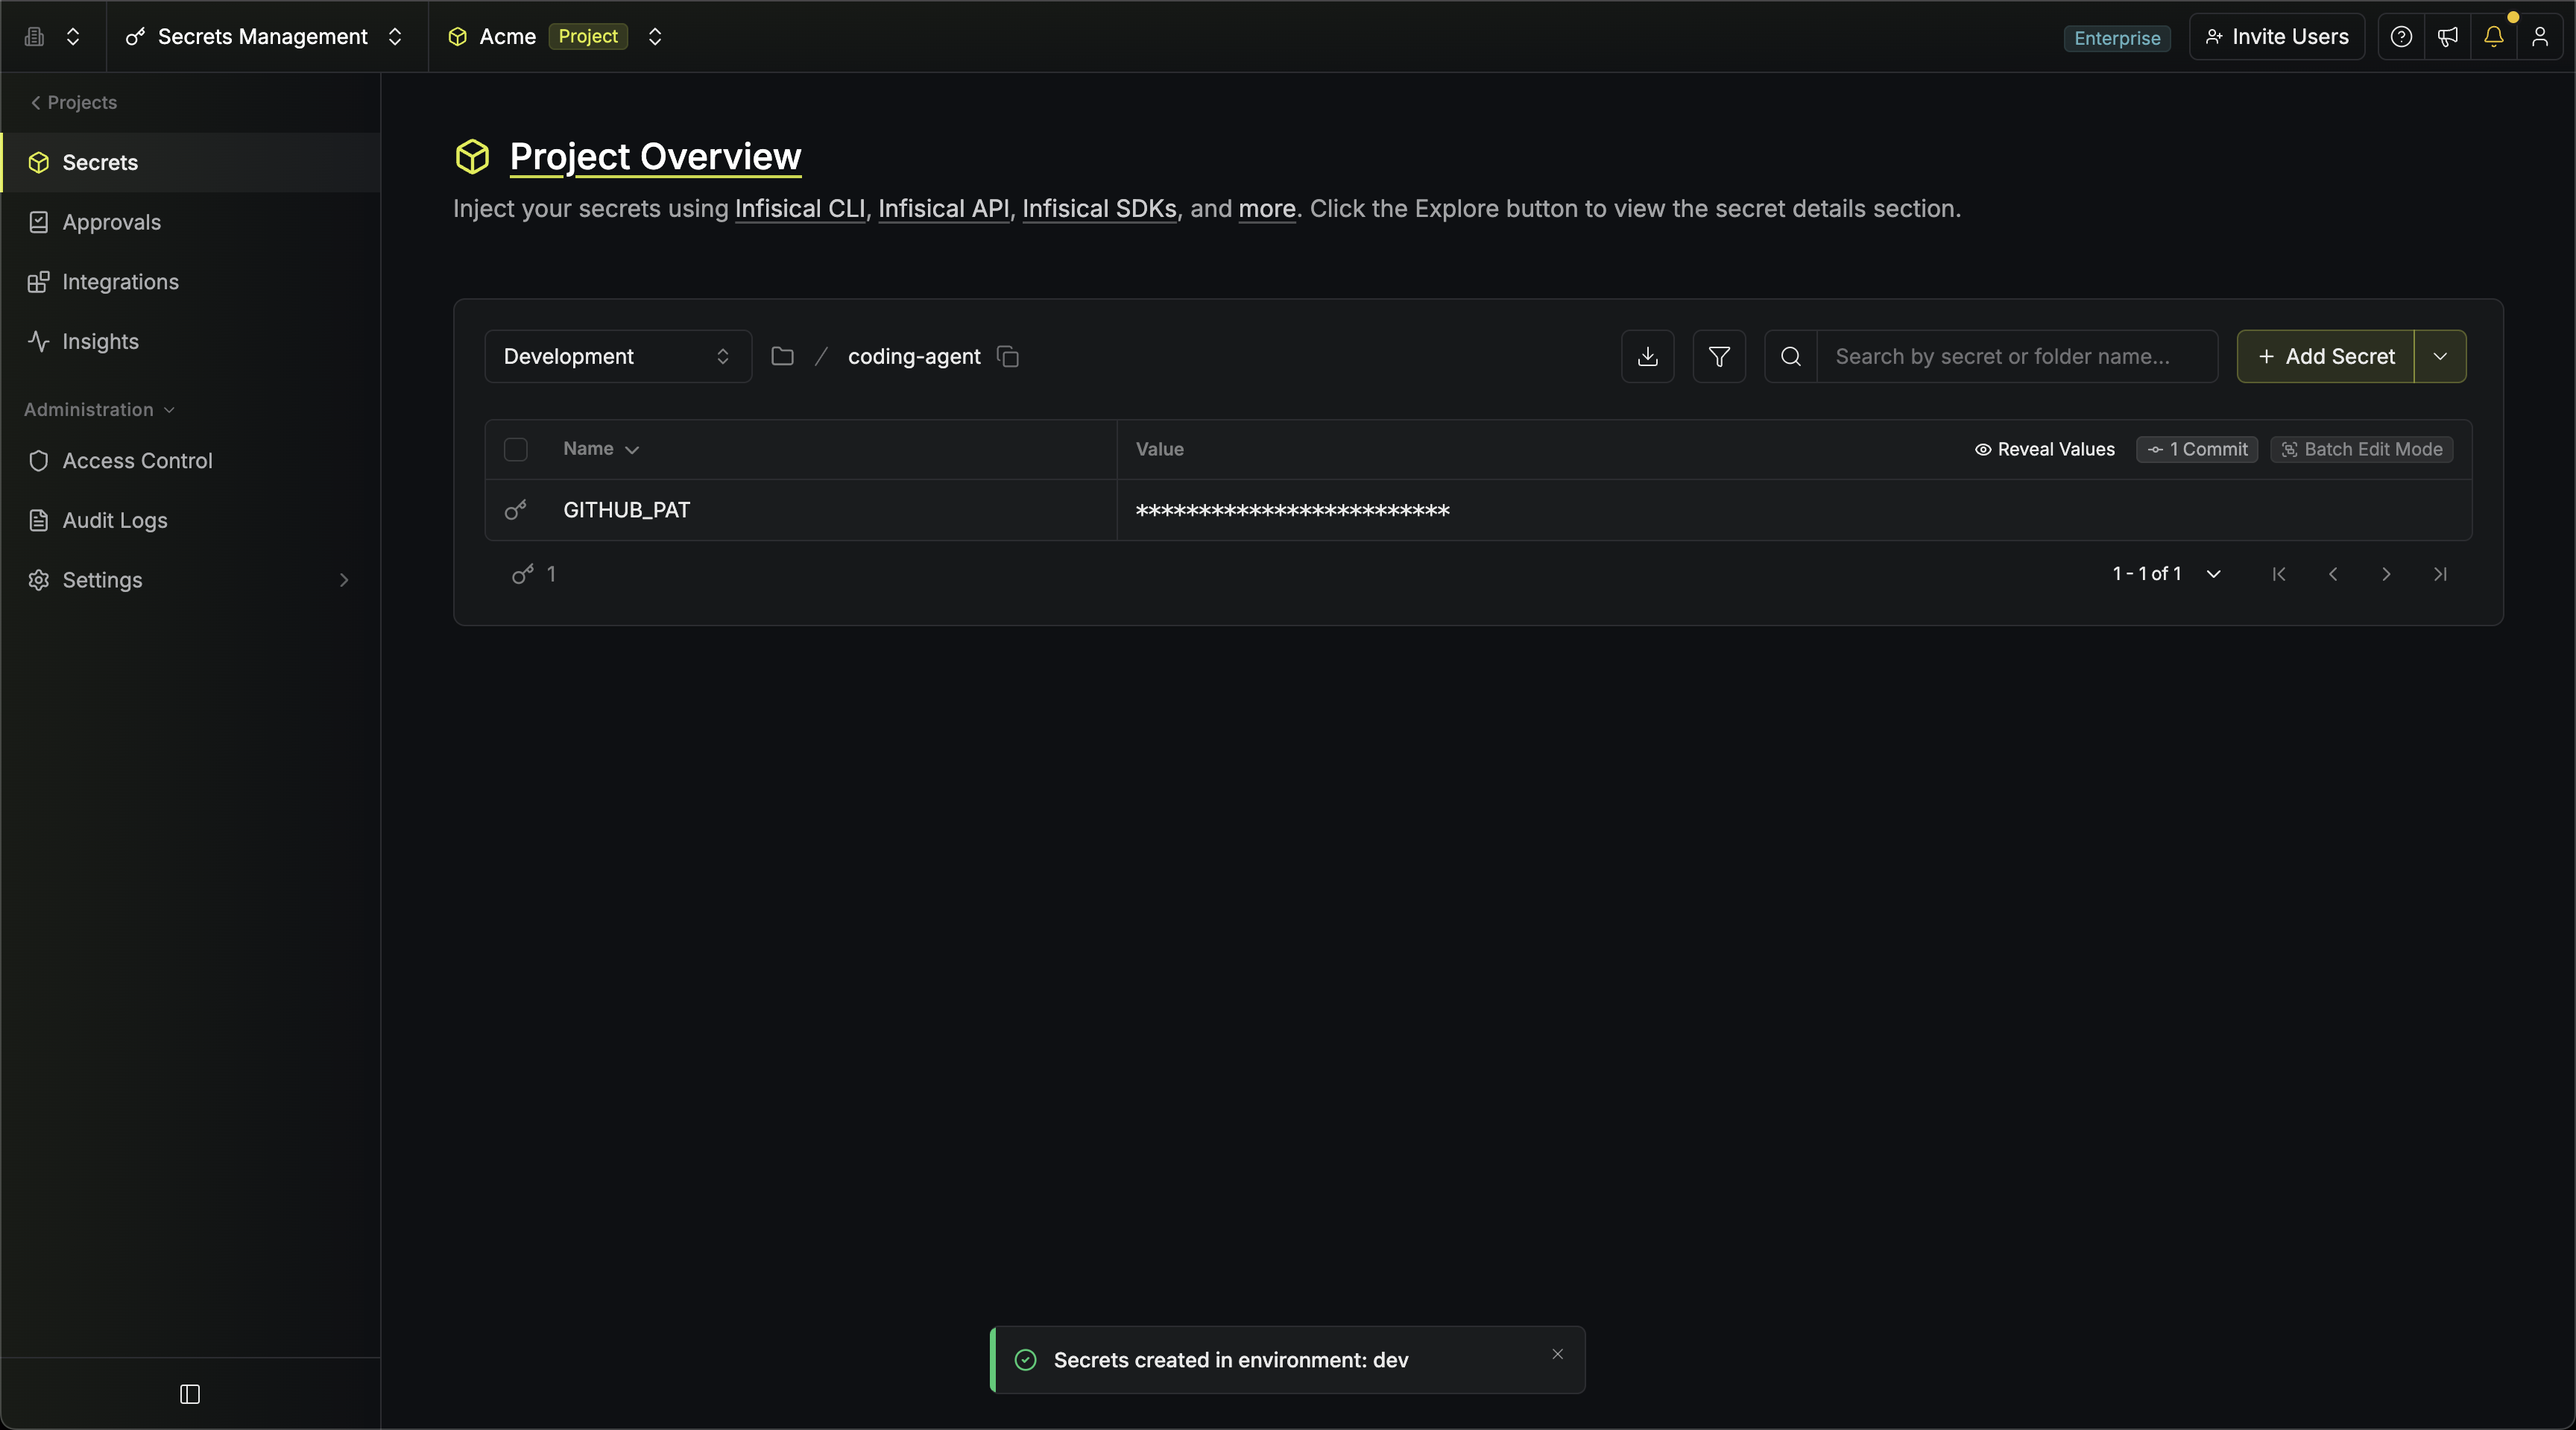
Then, in your Infisical project, create a folder for the agent (for example `/coding-agent` in the `dev` environment) and add a secret named `GITHUB_PAT` with that token as its value. It is a regular Infisical secret.
 ## 2. Create a proxied service
A proxied service maps a host to the secret the proxy applies. In the same folder, open the **Add Secret** dropdown and select **Add Proxied Service**, then work through the steps:
## 2. Create a proxied service
A proxied service maps a host to the secret the proxy applies. In the same folder, open the **Add Secret** dropdown and select **Add Proxied Service**, then work through the steps:
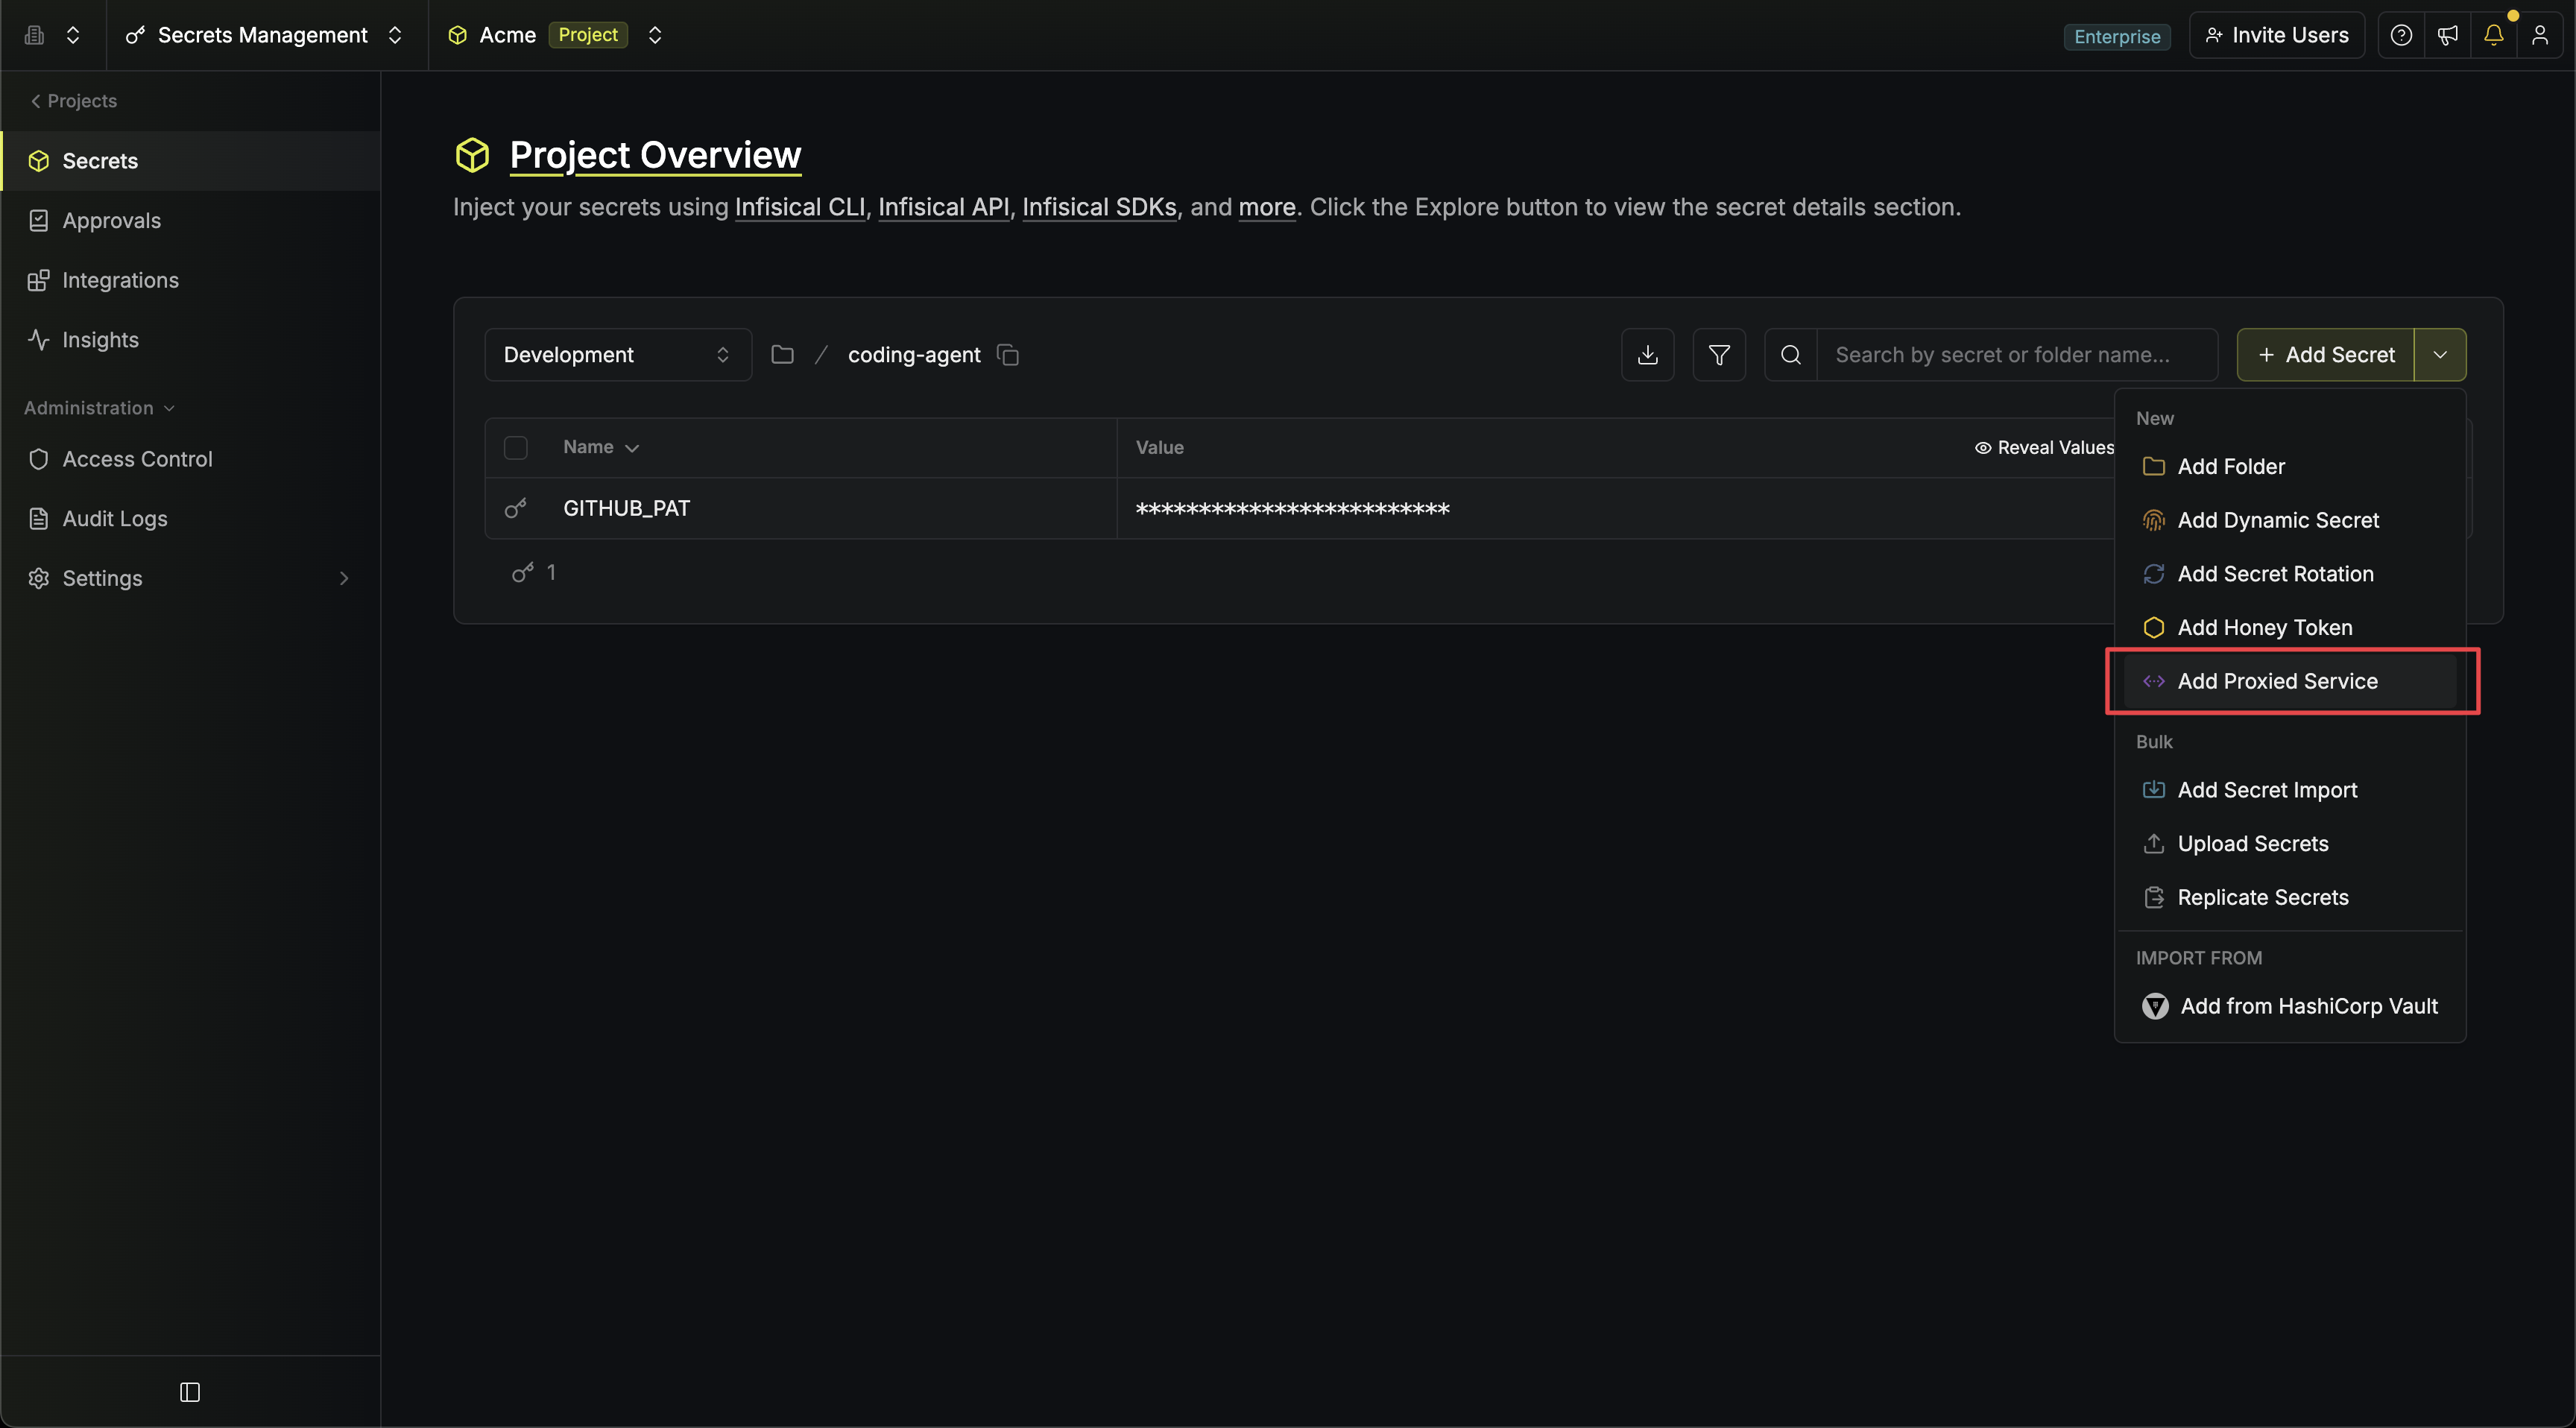 The template fills everything in for you: the host `api.github.com` and a **Secret Substitution** rule that hands the agent a realistic `ghp_…` placeholder and swaps in the real token on the way out.
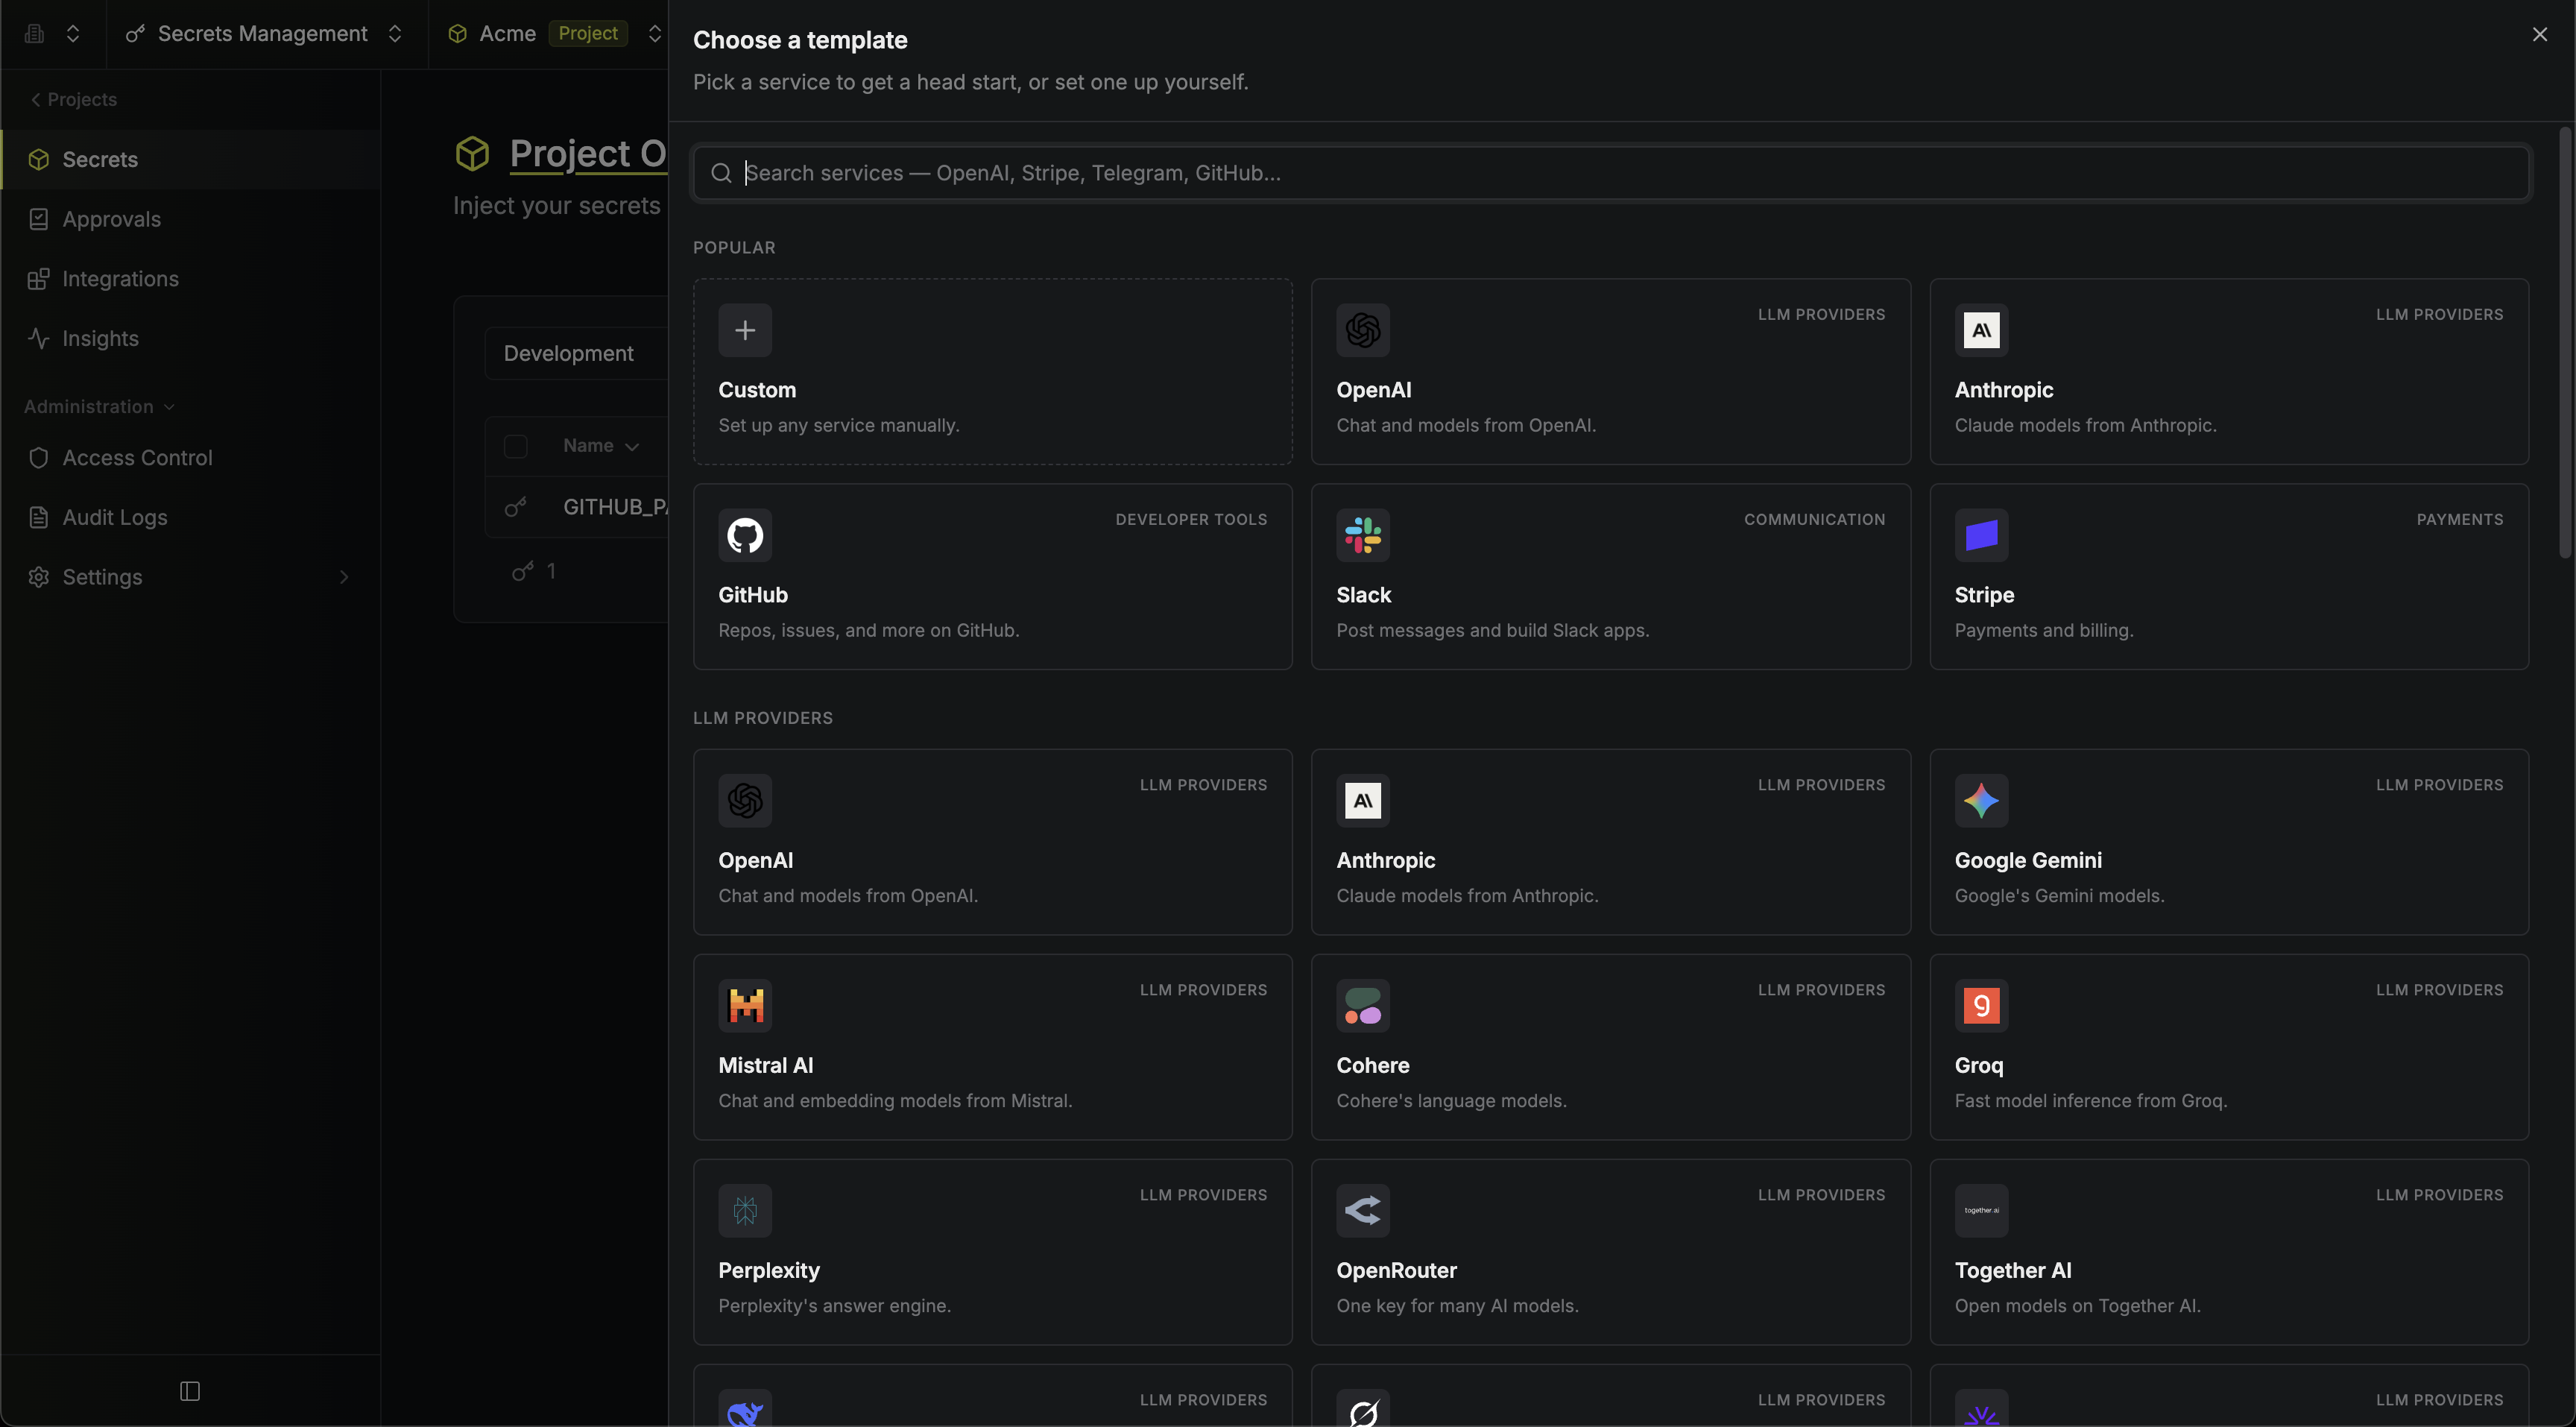 Keep the service name `github` and the host pattern `api.github.com`.
 This step is skipped automatically for GitHub. The token does travel in the `Authorization` header, but this template handles that with **Secret Substitution** (next step): the agent itself puts a placeholder in the header, and the proxy swaps it for the real token.
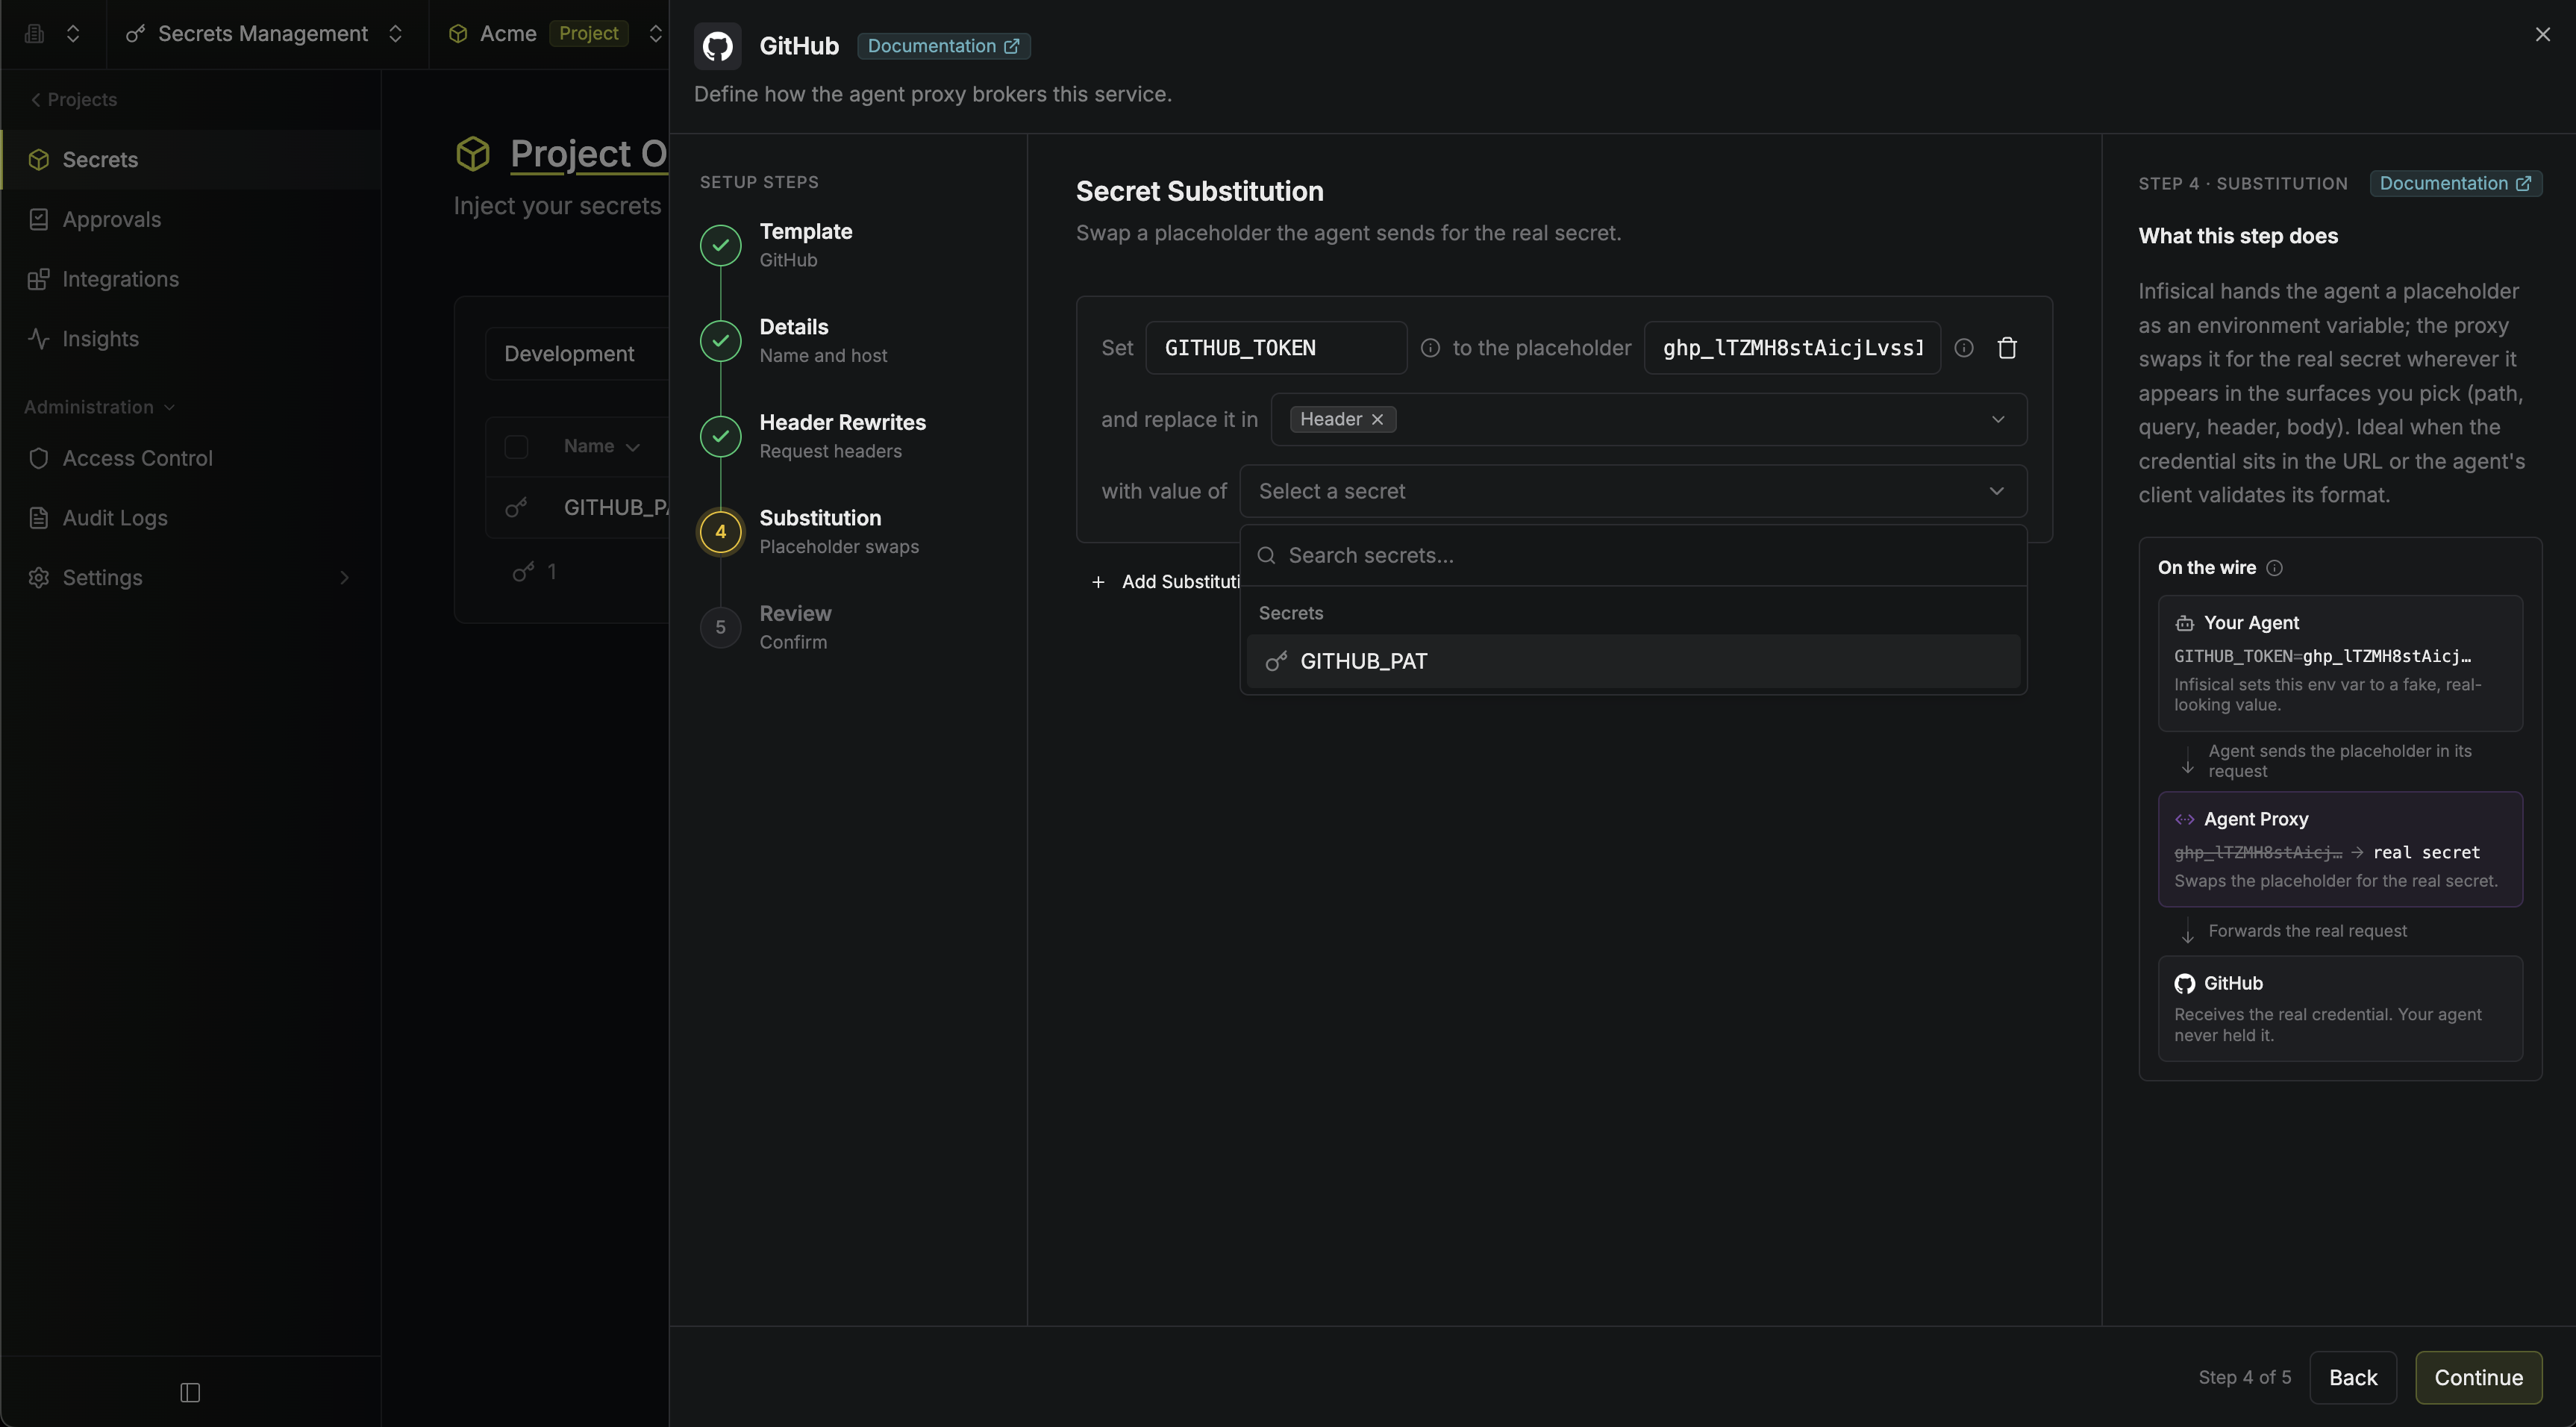
Select `GITHUB_PAT` as the secret holding the real value.
Here is how the pieces fit together. When your agent connects, it gets an environment variable `GITHUB_TOKEN` (the placeholder name the GitHub template uses) set to the fake `ghp_…` placeholder. The agent uses it like any GitHub token and sends `Authorization: Bearer `. As the request passes through the proxy, the placeholder is replaced with the real value of your `GITHUB_PAT` secret. The template scopes this swap to headers, since that is where GitHub expects the token; a substitution can also target the URL path, query, or body.
This step is skipped automatically for GitHub. The token does travel in the `Authorization` header, but this template handles that with **Secret Substitution** (next step): the agent itself puts a placeholder in the header, and the proxy swaps it for the real token.
Select `GITHUB_PAT` as the secret holding the real value.
Here is how the pieces fit together. When your agent connects, it gets an environment variable `GITHUB_TOKEN` (the placeholder name the GitHub template uses) set to the fake `ghp_…` placeholder. The agent uses it like any GitHub token and sends `Authorization: Bearer `. As the request passes through the proxy, the placeholder is replaced with the real value of your `GITHUB_PAT` secret. The template scopes this swap to headers, since that is where GitHub expects the token; a substitution can also target the URL path, query, or body.
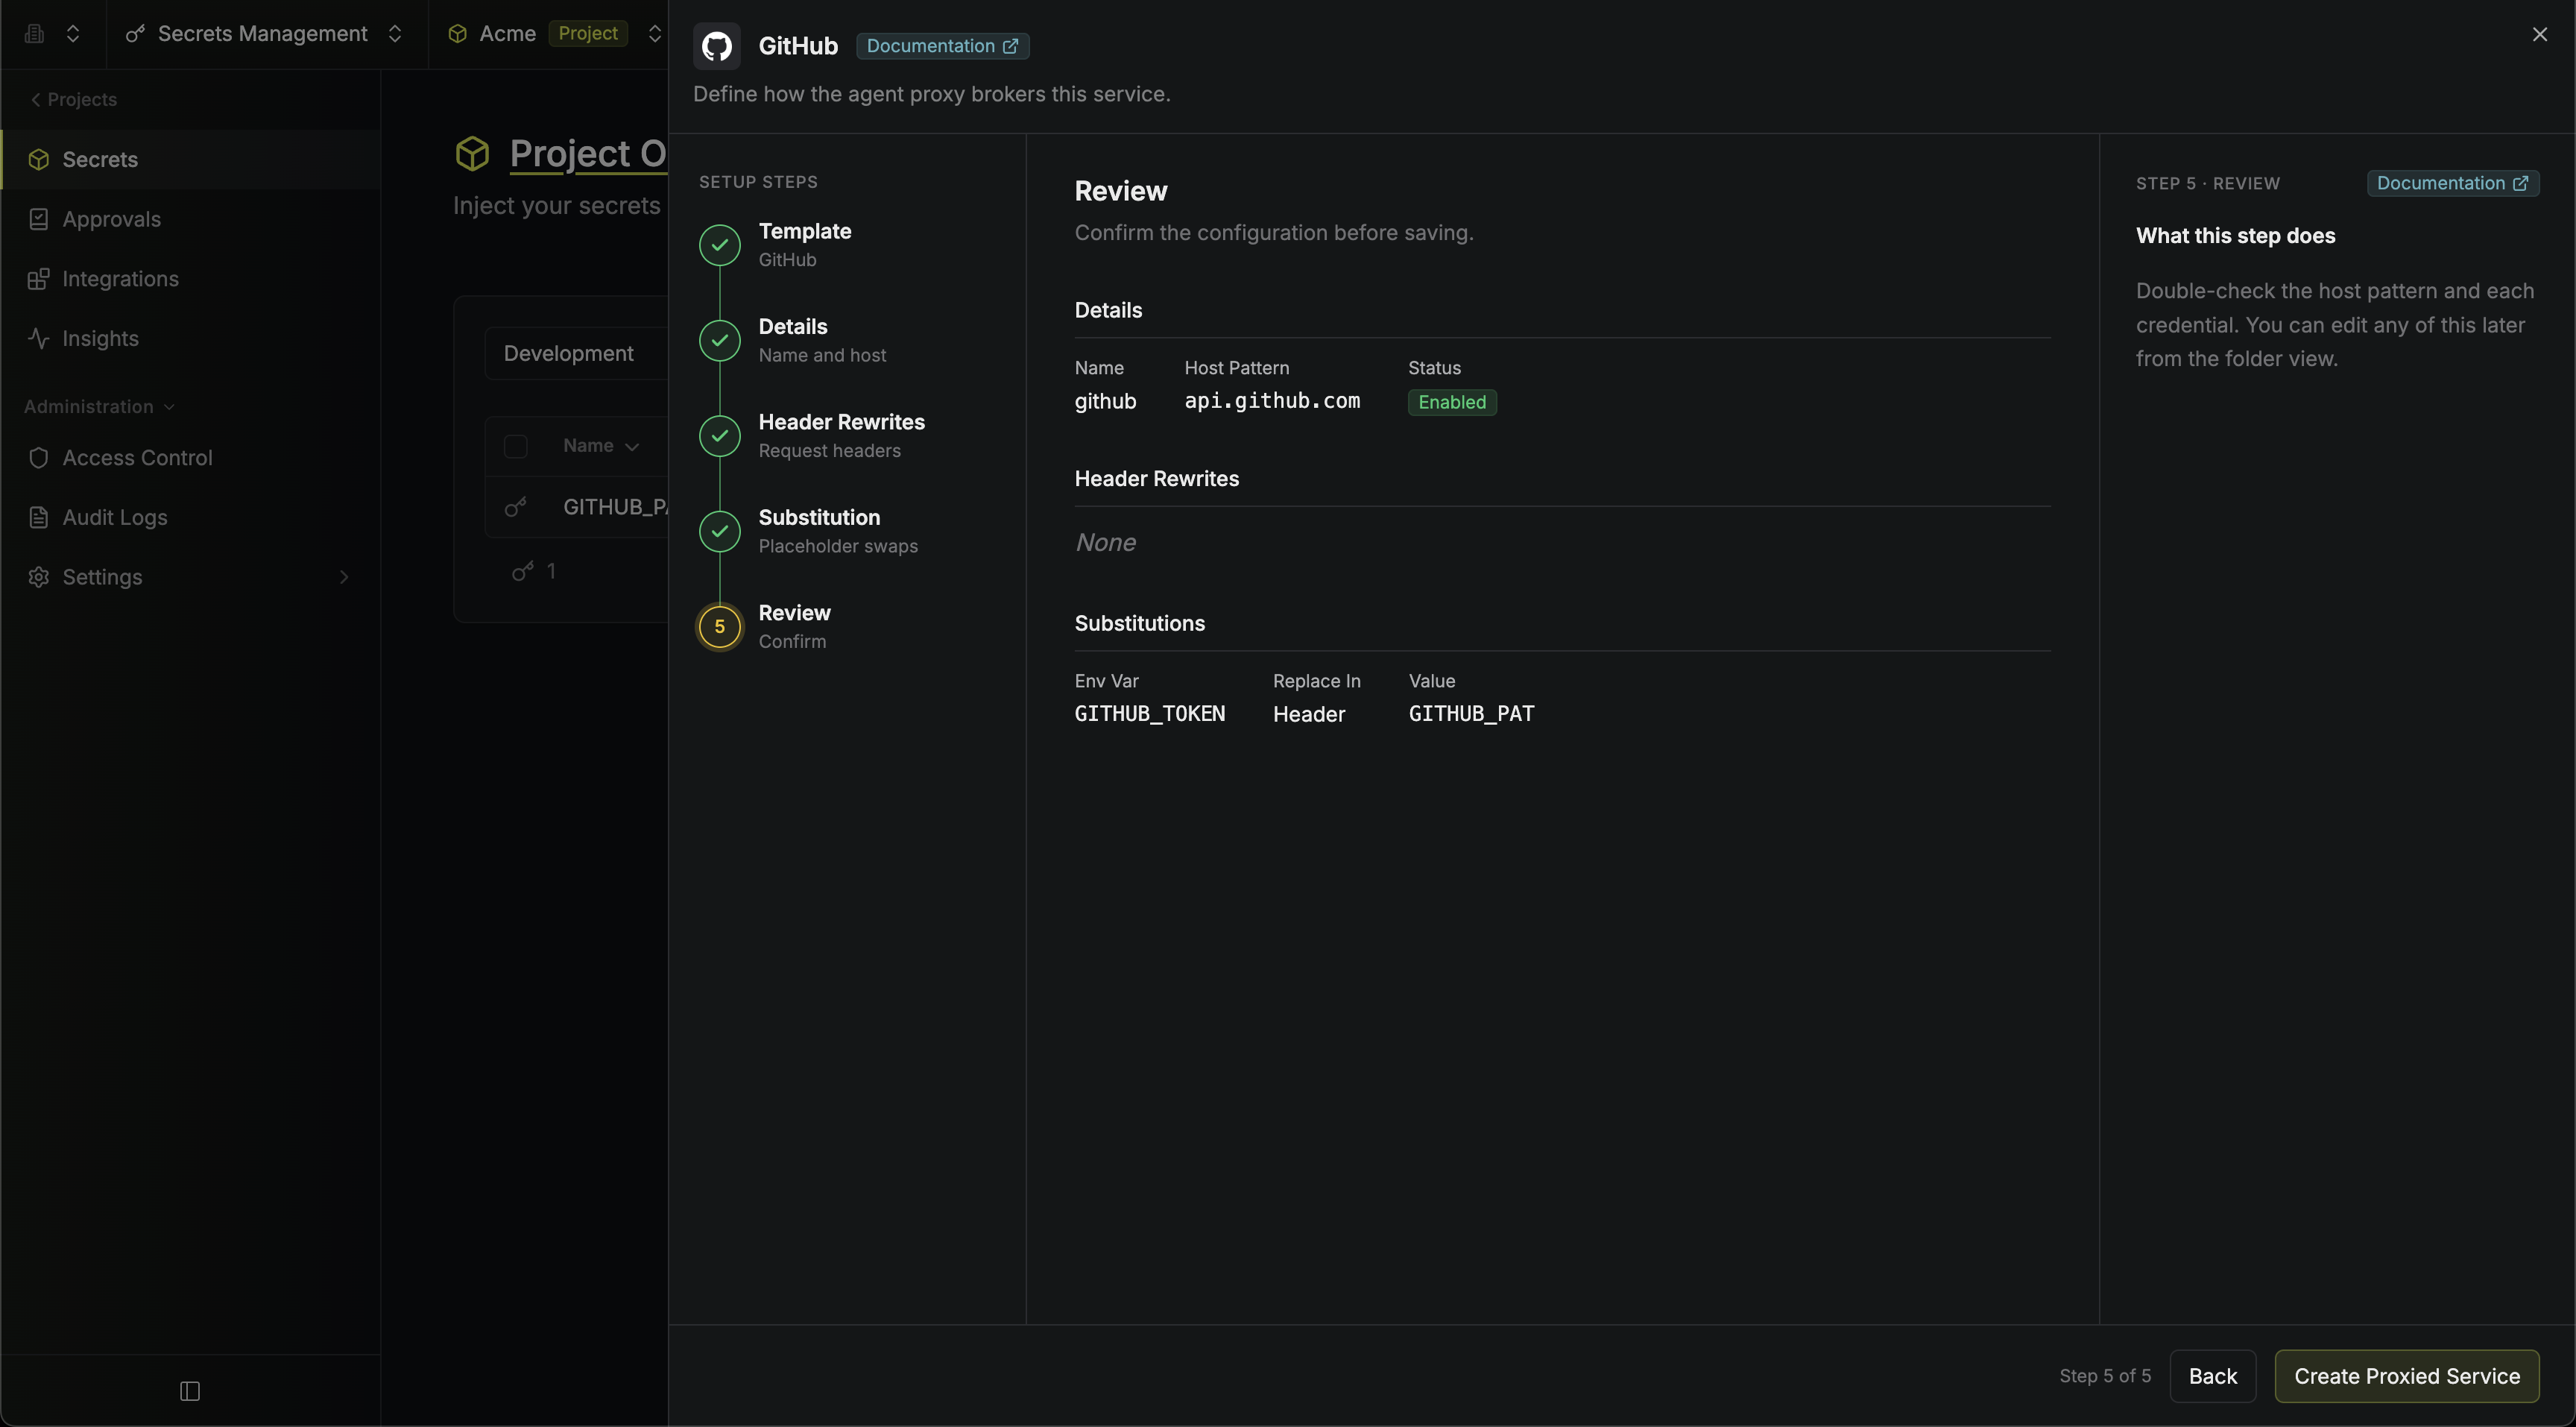
 Double-check the host pattern and the substitution rule, then click **Create Proxied Service**.
 Not on the template list? Pick **Custom** and configure a [header rewrite or secret substitution](/docs/documentation/platform/agent-proxy/proxied-services) by hand.
## 3. Create the proxy identity
The proxy and the agent authenticate as **two separate machine identities with opposite access**. That split is the whole security model: the proxy can read your secrets, the agent never can.
**The proxy identity reads the secrets.**
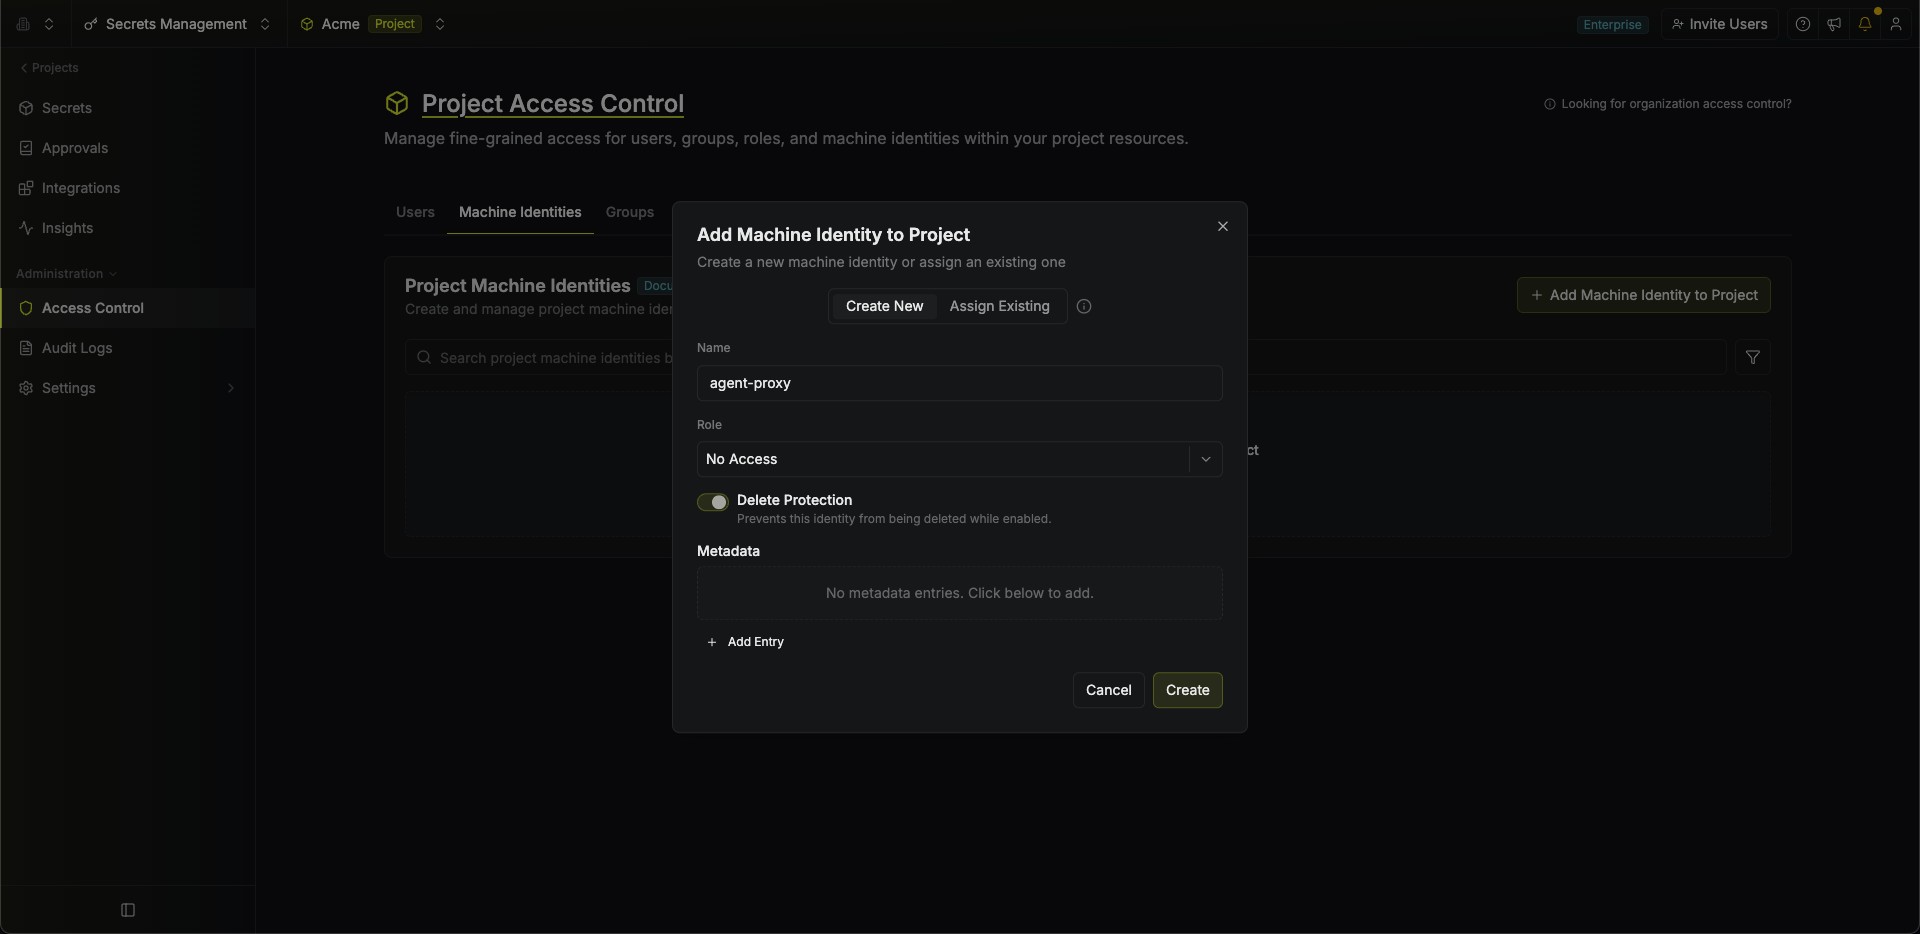
In your project, go to **Access Control → Machine Identities** and click **Add Machine Identity to Project → Create New**. Name it (for example `agent-proxy`) and create it.
Not on the template list? Pick **Custom** and configure a [header rewrite or secret substitution](/docs/documentation/platform/agent-proxy/proxied-services) by hand.
## 3. Create the proxy identity
The proxy and the agent authenticate as **two separate machine identities with opposite access**. That split is the whole security model: the proxy can read your secrets, the agent never can.
**The proxy identity reads the secrets.**
In your project, go to **Access Control → Machine Identities** and click **Add Machine Identity to Project → Create New**. Name it (for example `agent-proxy`) and create it.
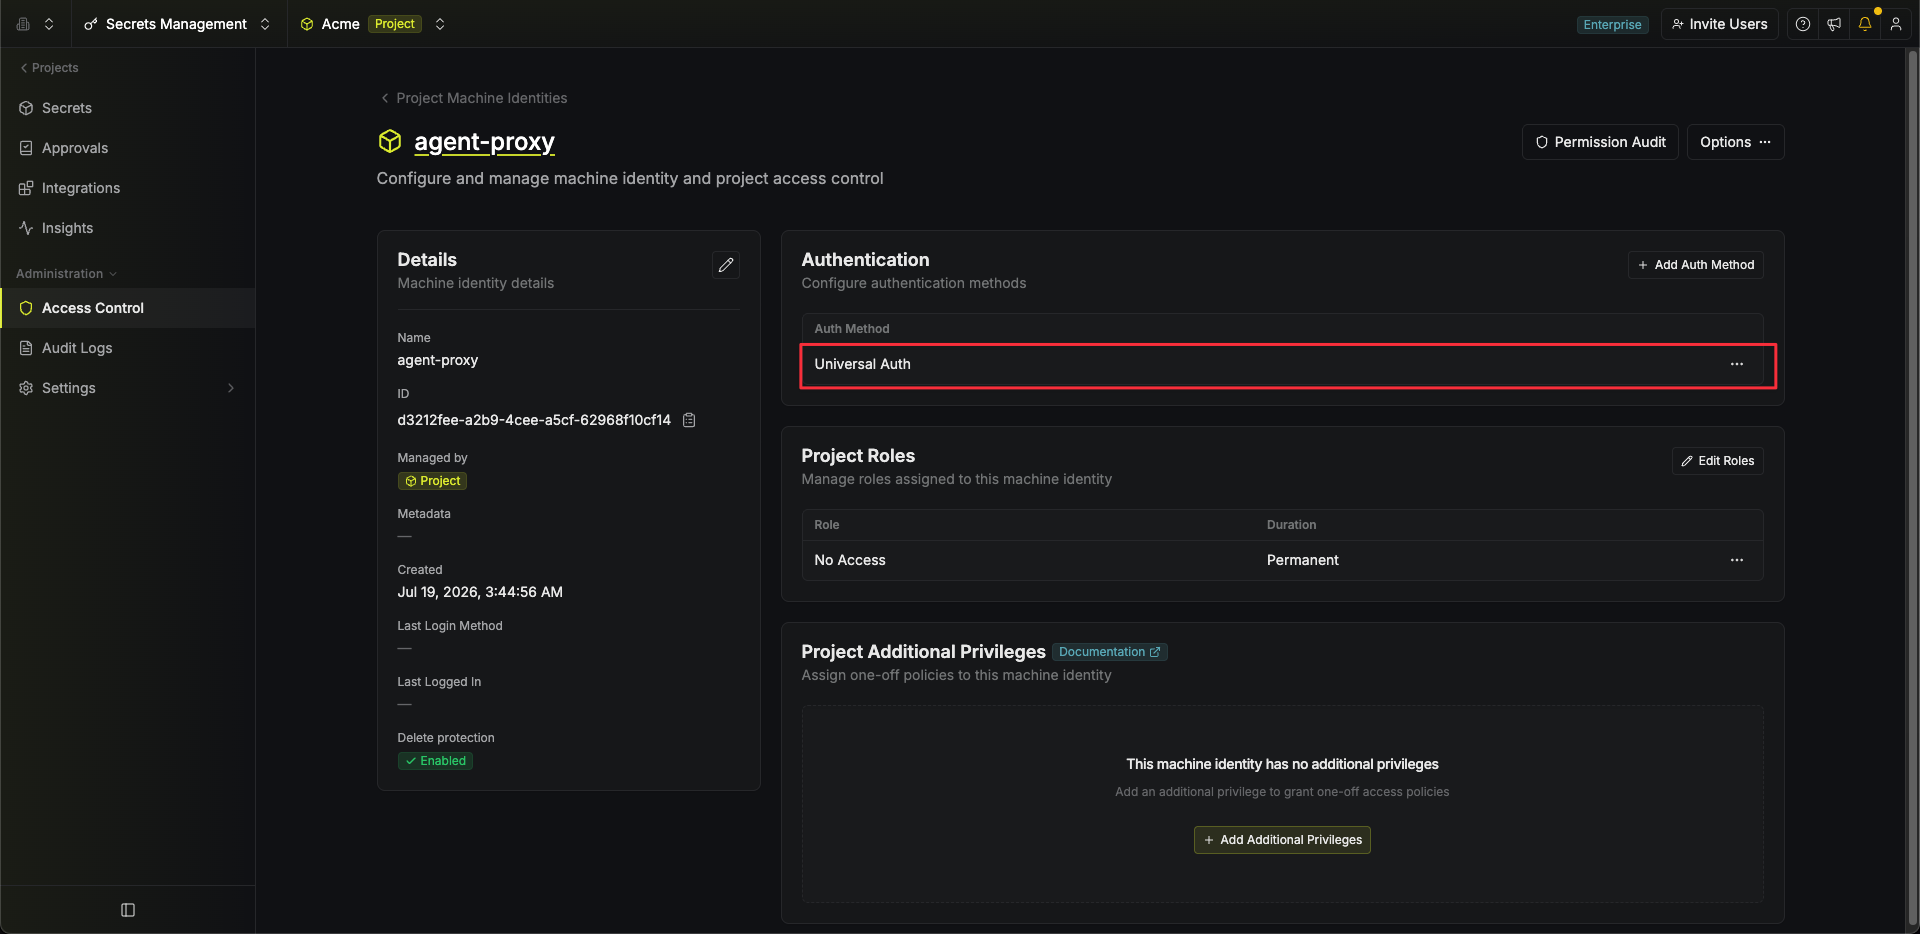
 Open the identity and go to its [Universal Auth](/docs/documentation/platform/identities/universal-auth) authentication method.
 Click **Add Client Secret**.
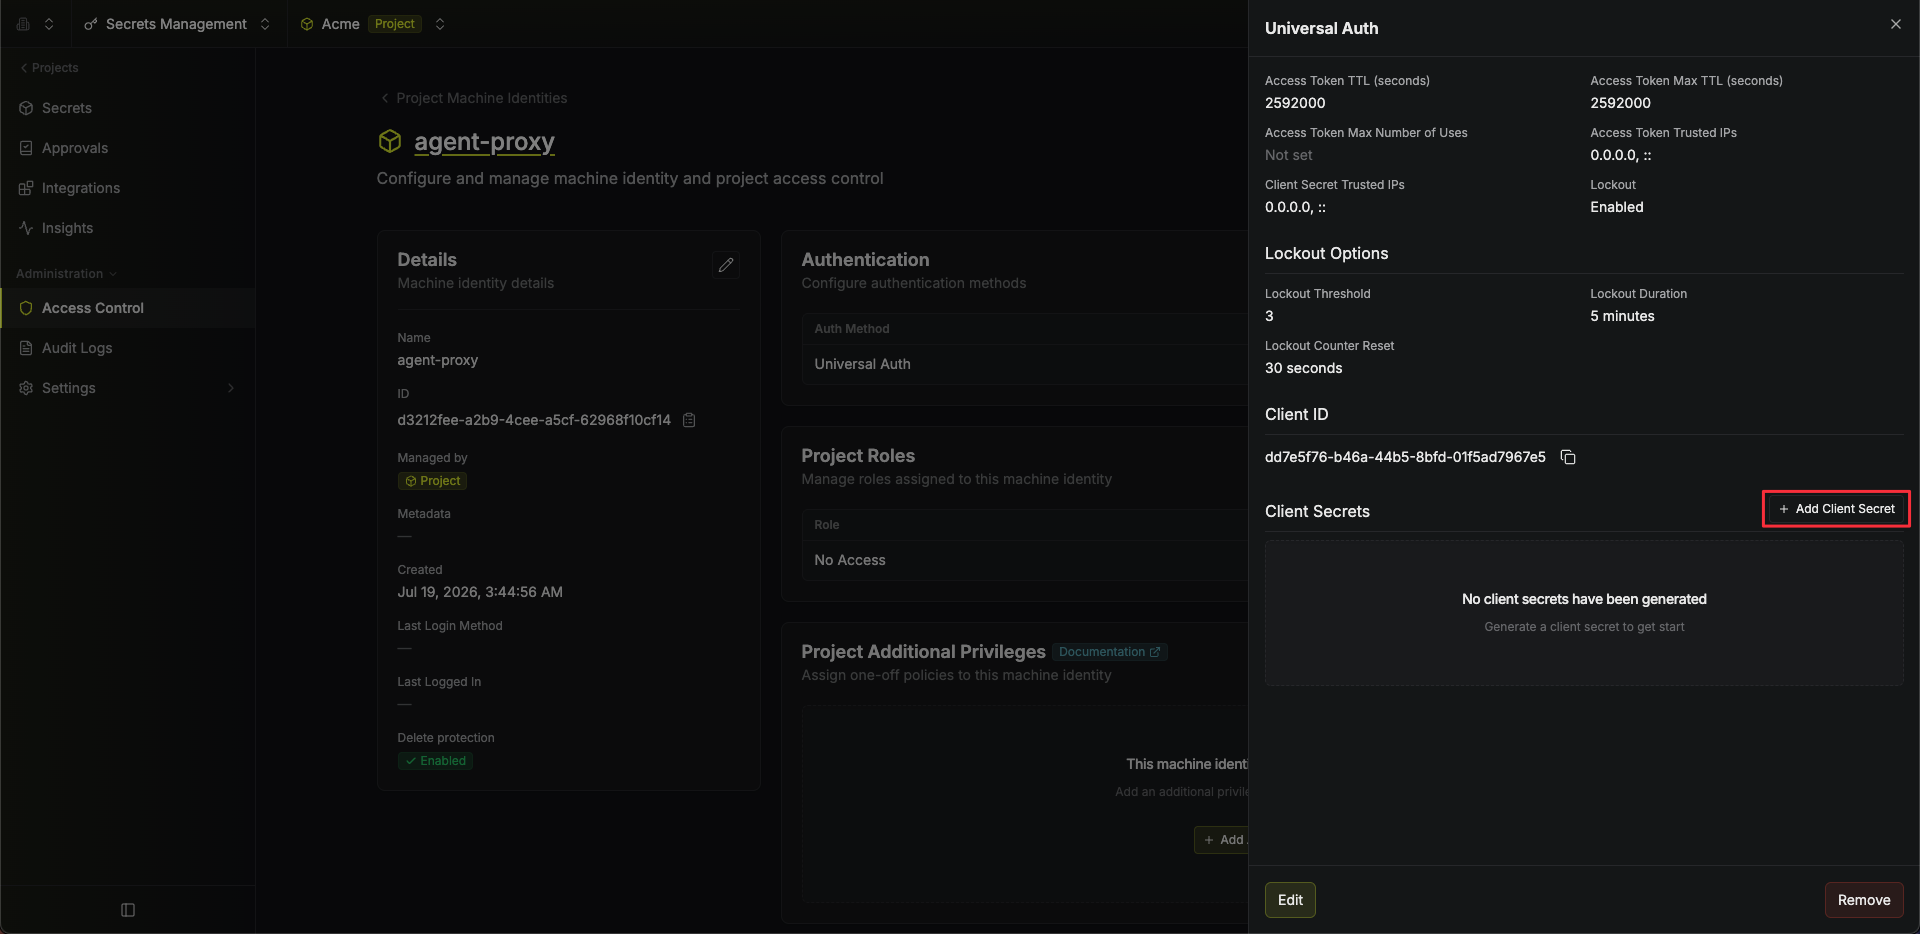 Save the **Client ID** and the **Client Secret**; you will pass both to the proxy in step 5.
Grant it `Read Value` and `Describe Secret` on **Secrets** for the secrets your services reference. The quickest way is an [additional privilege](/docs/documentation/platform/access-controls/additional-privileges) directly on the identity: open it and click **Add Additional Privileges**.
Save the **Client ID** and the **Client Secret**; you will pass both to the proxy in step 5.
Grant it `Read Value` and `Describe Secret` on **Secrets** for the secrets your services reference. The quickest way is an [additional privilege](/docs/documentation/platform/access-controls/additional-privileges) directly on the identity: open it and click **Add Additional Privileges**.
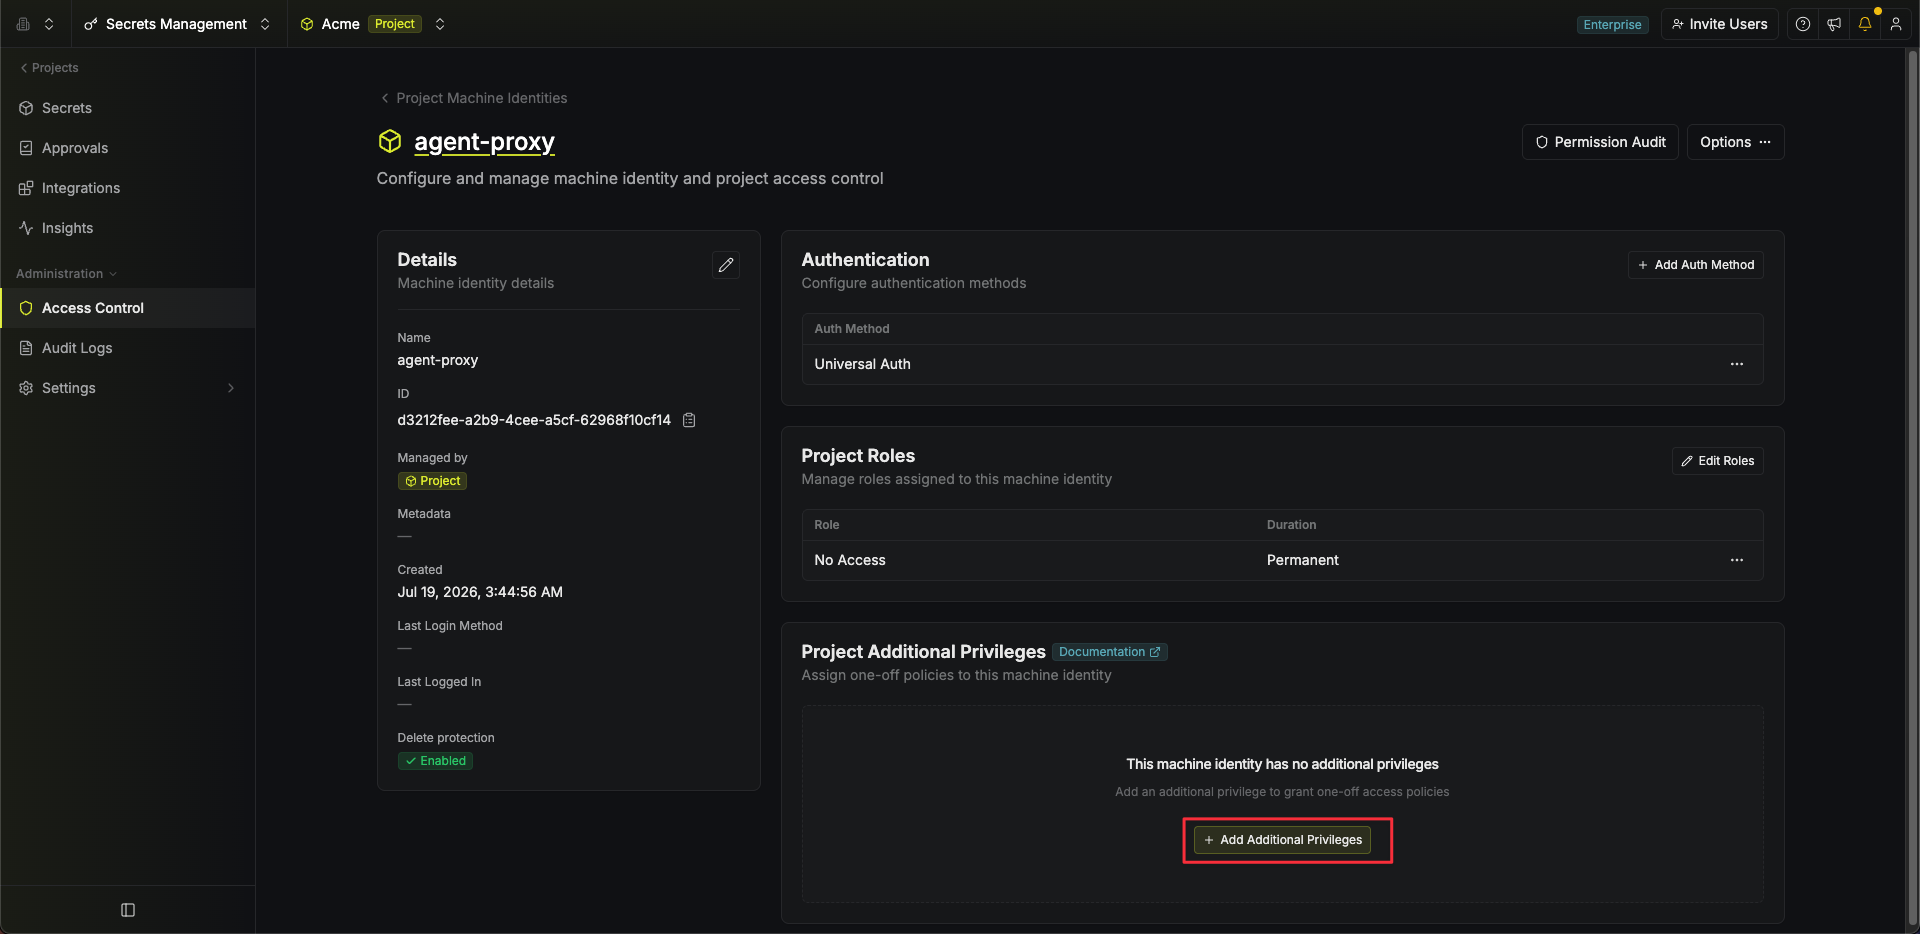 Add a **Secrets** policy allowing both `Read Value` and `Describe Secret`. A [custom role](/docs/documentation/platform/access-controls/role-based-access-controls) with the same policy, assigned to the identity, works too.
If you plan to broker [dynamic secrets](/docs/documentation/platform/agent-proxy/proxied-services#using-dynamic-secrets) later, also allow `Manage Leases` on **Dynamic Secrets** while you are here. Only the proxy identity gets it; the agent identity never should.
Add a **Secrets** policy allowing both `Read Value` and `Describe Secret`. A [custom role](/docs/documentation/platform/access-controls/role-based-access-controls) with the same policy, assigned to the identity, works too.
If you plan to broker [dynamic secrets](/docs/documentation/platform/agent-proxy/proxied-services#using-dynamic-secrets) later, also allow `Manage Leases` on **Dynamic Secrets** while you are here. Only the proxy identity gets it; the agent identity never should.
 ## 4. Create the agent identity
**The agent identity routes traffic but reads no secrets.** It needs the `Proxy` permission and nothing else.
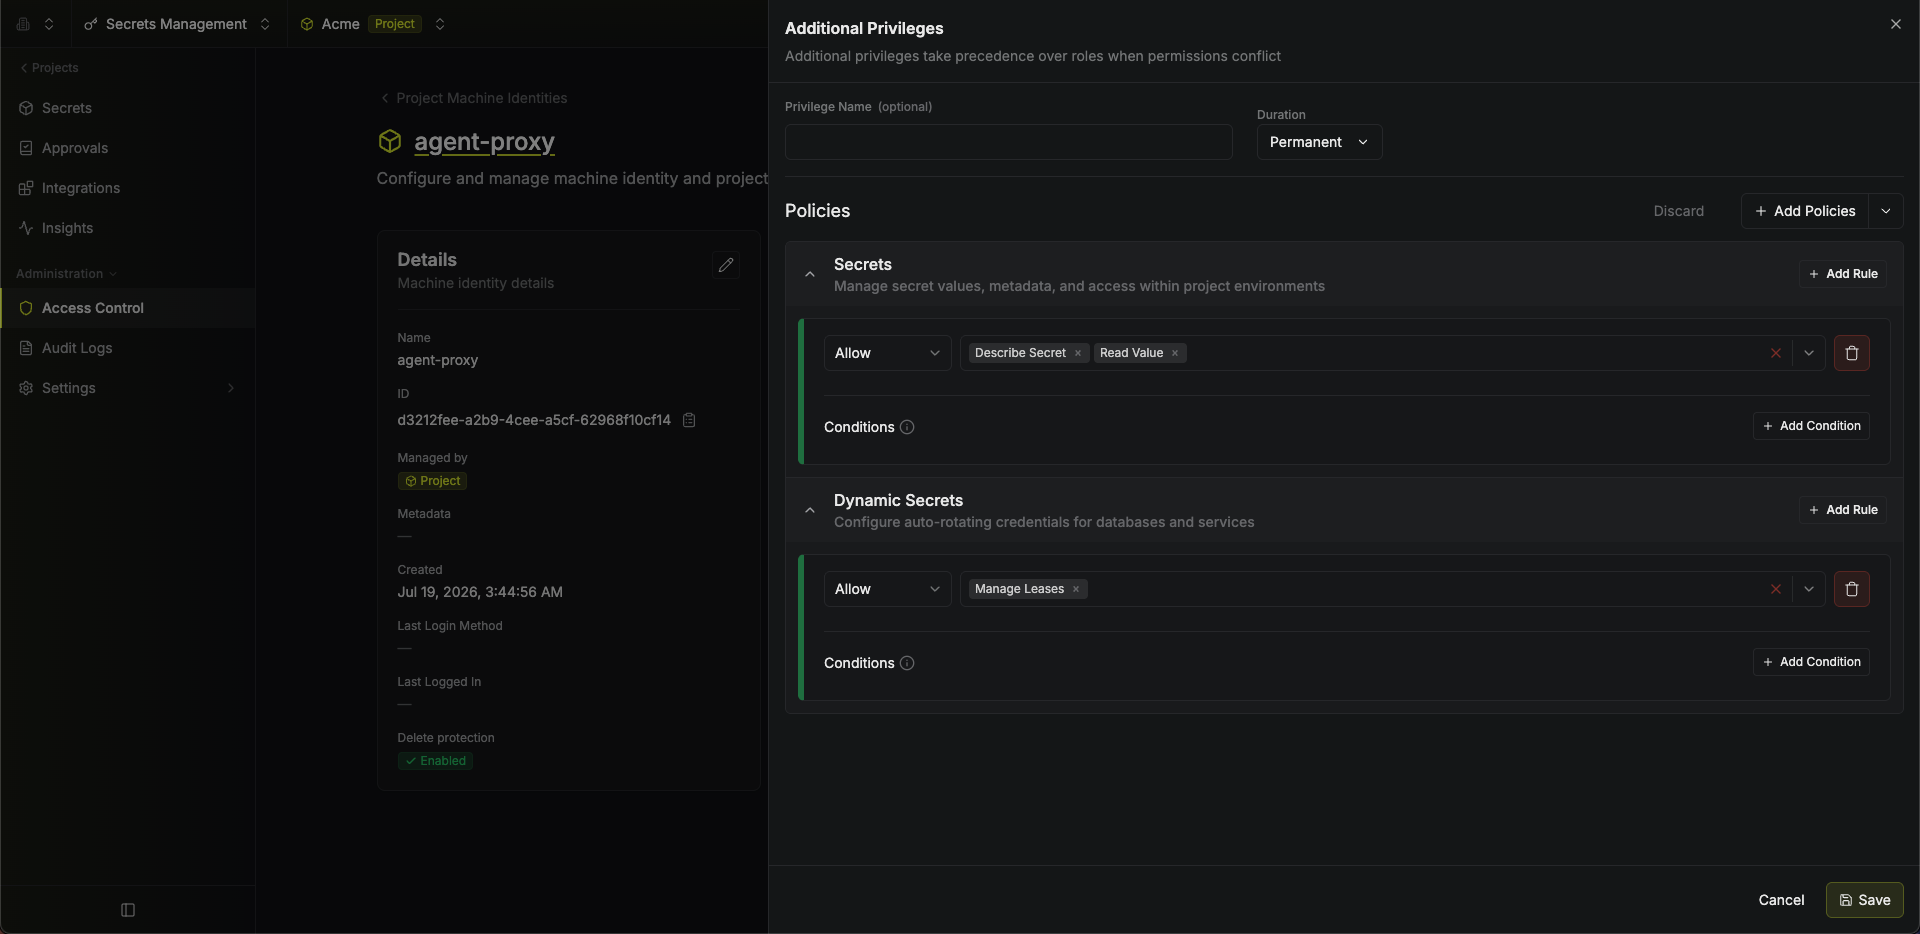
In your project, go to **Access Control → Machine Identities** and click **Add Machine Identity to Project → Create New**. Name it (for example `agent`) and create it.
## 4. Create the agent identity
**The agent identity routes traffic but reads no secrets.** It needs the `Proxy` permission and nothing else.
In your project, go to **Access Control → Machine Identities** and click **Add Machine Identity to Project → Create New**. Name it (for example `agent`) and create it.
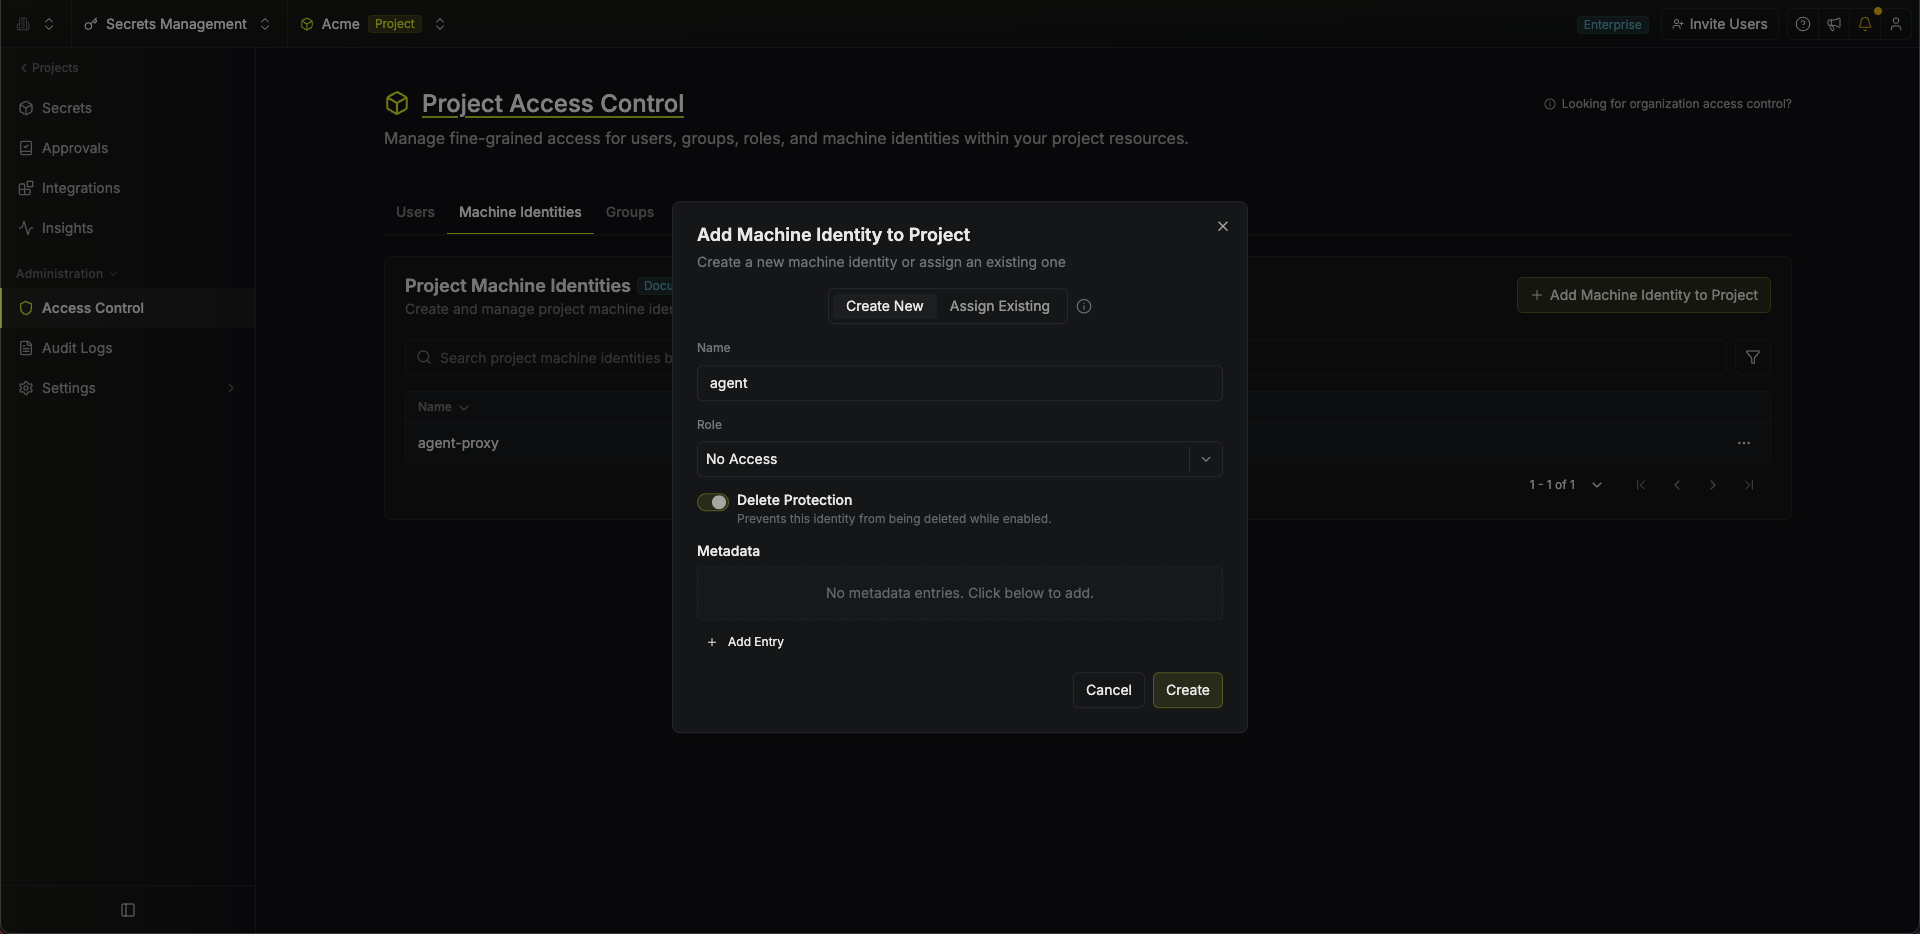 Open the identity and add a **Client Secret** under Universal Auth, exactly as in the previous step. Save the **Client ID** and the **Client Secret**; you will pass both to the agent in step 6.
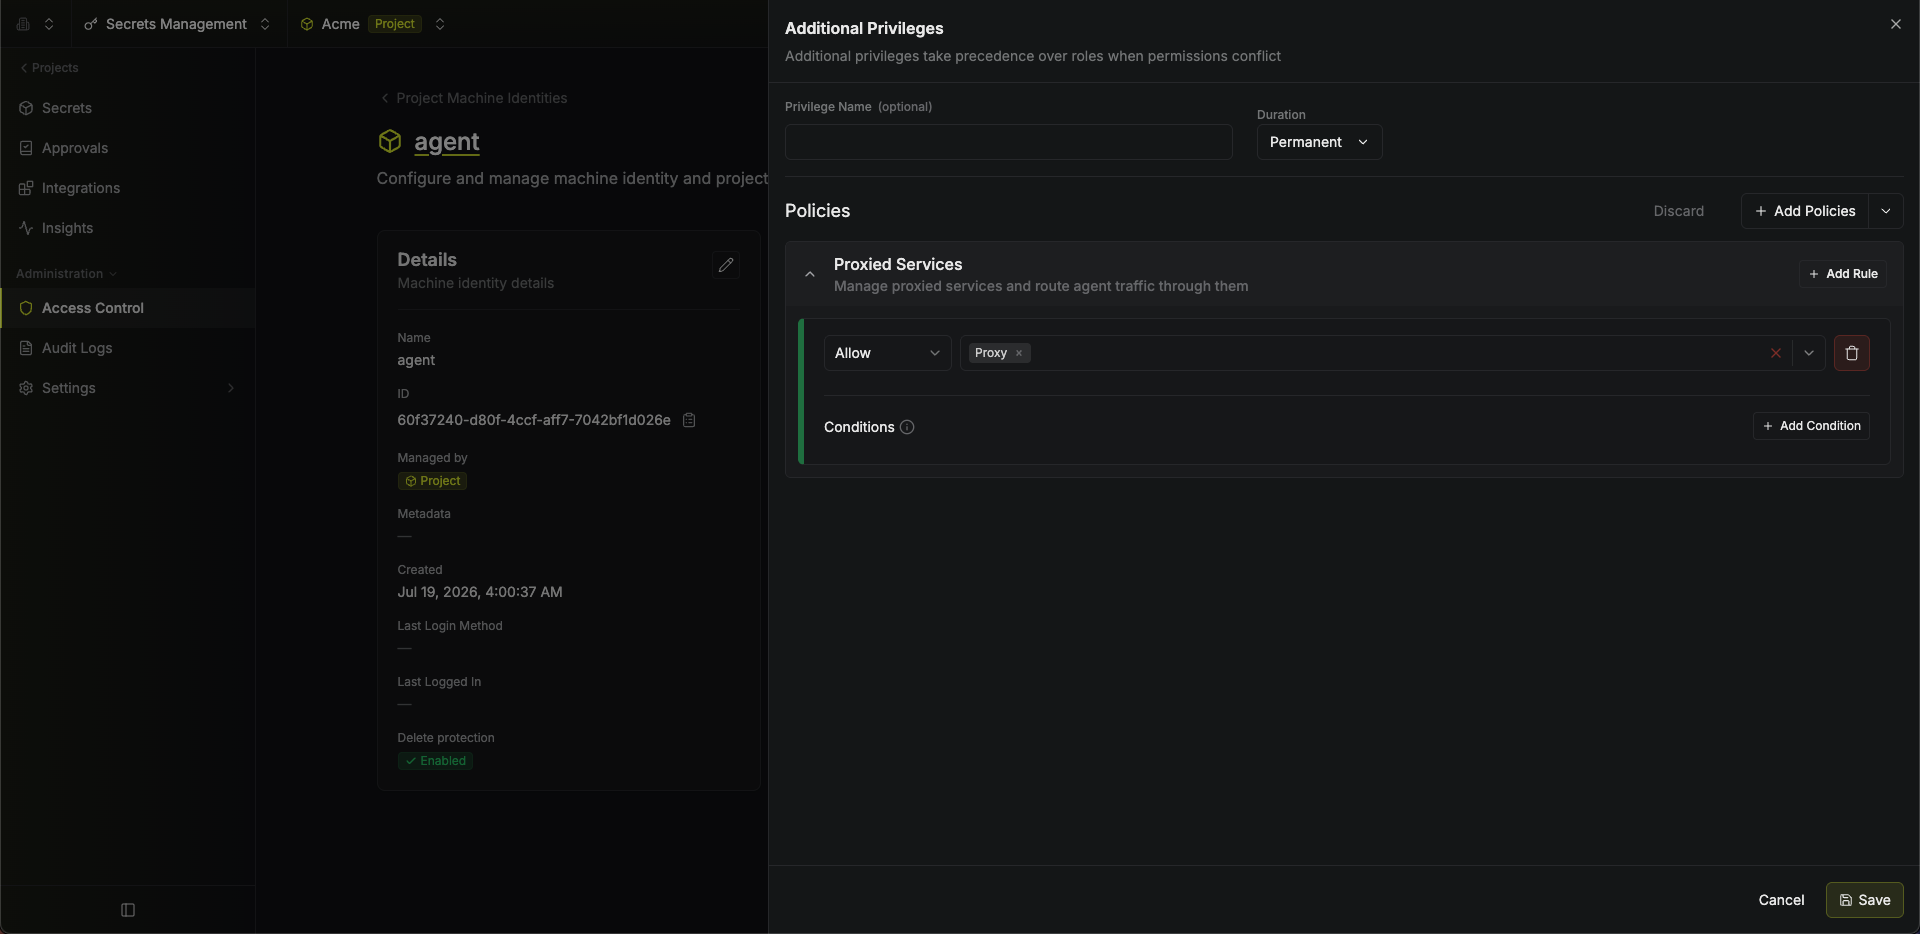
Grant it only `Proxy` on **Proxied Services**, scoped to the environment and path where your services live, the same way you granted the proxy identity's permissions.
Open the identity and add a **Client Secret** under Universal Auth, exactly as in the previous step. Save the **Client ID** and the **Client Secret**; you will pass both to the agent in step 6.
Grant it only `Proxy` on **Proxied Services**, scoped to the environment and path where your services live, the same way you granted the proxy identity's permissions.
 ## 5. Start the agent proxy
On the proxy host, a separate machine in your agent's private network, install the [Infisical CLI](/docs/cli/overview). Or use Docker for the container option below.
Set `INFISICAL_UNIVERSAL_AUTH_CLIENT_ID` and `INFISICAL_UNIVERSAL_AUTH_CLIENT_SECRET` to the Client ID and Client Secret you saved in step 3.
```bash theme={"dark"}
# Authenticate as the proxy identity (from step 3)
export INFISICAL_UNIVERSAL_AUTH_CLIENT_ID=
export INFISICAL_UNIVERSAL_AUTH_CLIENT_SECRET=
```
```bash theme={"dark"}
# Authenticate as the proxy identity (from step 3), pointed at EU Cloud
export INFISICAL_UNIVERSAL_AUTH_CLIENT_ID=
export INFISICAL_UNIVERSAL_AUTH_CLIENT_SECRET=
export INFISICAL_DOMAIN=https://eu.infisical.com
```
```bash theme={"dark"}
# Authenticate as the proxy identity (from step 3), pointed at your instance
export INFISICAL_UNIVERSAL_AUTH_CLIENT_ID=
export INFISICAL_UNIVERSAL_AUTH_CLIENT_SECRET=
export INFISICAL_DOMAIN=https://infisical.your-domain.com
```
The proxy listens on port `17322` by default. Use the CLI or Docker:
```bash theme={"dark"}
infisical secrets agent-proxy start
```
```bash theme={"dark"}
# -e without a value passes through the variables you exported above
docker run -p 17322:17322 \
-e INFISICAL_UNIVERSAL_AUTH_CLIENT_ID \
-e INFISICAL_UNIVERSAL_AUTH_CLIENT_SECRET \
-e INFISICAL_DOMAIN \
infisical/cli:latest secrets agent-proxy start
```
Remember this host's address; the next step points `INFISICAL_AGENT_PROXY_ADDRESS` at it. For production deployment, see [Deployment](/docs/documentation/platform/agent-proxy/deployment).
## 6. Connect your agent
On the agent host, install the [Infisical CLI](/docs/cli/overview); `connect` is a CLI command.
Set the agent's authentication and connection details as environment variables:
```bash theme={"dark"}
# Authenticate as the agent identity (from step 4)
export INFISICAL_UNIVERSAL_AUTH_CLIENT_ID=
export INFISICAL_UNIVERSAL_AUTH_CLIENT_SECRET=
# Scope: your project, plus the environment and folder from step 1
export INFISICAL_PROJECT_ID=
export INFISICAL_ENVIRONMENT=dev
export INFISICAL_SECRET_PATH=/coding-agent
# The agent proxy to route through (from step 5)
export INFISICAL_AGENT_PROXY_ADDRESS=:17322
```
```bash theme={"dark"}
# Authenticate as the agent identity (from step 4), pointed at EU Cloud
export INFISICAL_UNIVERSAL_AUTH_CLIENT_ID=
export INFISICAL_UNIVERSAL_AUTH_CLIENT_SECRET=
export INFISICAL_DOMAIN=https://eu.infisical.com
# Scope: your project, plus the environment and folder from step 1
export INFISICAL_PROJECT_ID=
export INFISICAL_ENVIRONMENT=dev
export INFISICAL_SECRET_PATH=/coding-agent
# The agent proxy to route through (from step 5)
export INFISICAL_AGENT_PROXY_ADDRESS=:17322
```
```bash theme={"dark"}
# Authenticate as the agent identity (from step 4), pointed at your instance
export INFISICAL_UNIVERSAL_AUTH_CLIENT_ID=
export INFISICAL_UNIVERSAL_AUTH_CLIENT_SECRET=
export INFISICAL_DOMAIN=https://infisical.your-domain.com
# Scope: your project, plus the environment and folder from step 1
export INFISICAL_PROJECT_ID=
export INFISICAL_ENVIRONMENT=dev
export INFISICAL_SECRET_PATH=/coding-agent
# The agent proxy to route through (from step 5)
export INFISICAL_AGENT_PROXY_ADDRESS=:17322
```
Launch the agent through `connect`. Everything after `--` is the agent's own command:
```bash theme={"dark"}
infisical secrets agent-proxy connect -- claude
```
```bash theme={"dark"}
infisical secrets agent-proxy connect -- codex
```
```bash theme={"dark"}
infisical secrets agent-proxy connect --
```
The agent starts and behaves exactly as if you had launched it directly; nothing about it looks different. In its environment it finds `GITHUB_TOKEN`, set by `connect` to the fake placeholder, and uses it like a normal token. Its traffic now routes through the proxy: on calls to `api.github.com` the placeholder is swapped for the real token, and everything else passes through untouched. The next step makes that visible.
Every setting here can also be passed as a flag or set in `.infisical.json`. See [Connecting Agents](/docs/documentation/platform/agent-proxy/connecting-agents) for how `connect` works and what it puts in the agent's environment.
## 7. Verify it works
Each method below makes the same `GET /user` call to `api.github.com`. The client sends only the `ghp_…` placeholder that `connect` put in the environment; as the request passes through the proxy, the placeholder is swapped for the real value of your `GITHUB_PAT` secret. GitHub returns your account profile even though the real token never reached the client. That is the whole point: real authenticated work without the caller ever holding the credential.
The agent you launched in step 6 is already brokering. In its session, send:
> Run `gh api user` and show me the output.
[GitHub's `gh` CLI](https://cli.github.com/) reads `GITHUB_TOKEN` from the environment on its own, so the agent needs no token wiring; it just runs the command and GitHub returns your profile. Requires `gh` on the host where the agent runs.
Not driving an interactive agent? Run the check through `connect` directly, in the shell where you set the step 6 variables:
```bash theme={"dark"}
infisical secrets agent-proxy connect -- gh api user
```
`gh` reads `GITHUB_TOKEN` automatically, so there is nothing else to pass. Requires `gh` on the host where you run this.
No `gh`? Any HTTP client works the same way. `curl` sends the placeholder in the header and the proxy swaps it:
```bash theme={"dark"}
infisical secrets agent-proxy connect -- \
sh -c 'curl -sS https://api.github.com/user -H "Authorization: Bearer $GITHUB_TOKEN"'
```
Getting a `401`? The proxy could not apply the credential and forwarded the placeholder unchanged (it does not block the call). Check the proxy's logs, and confirm the agent identity has `Proxy` on the service and the proxy identity has `Read Value` on `GITHUB_PAT`.
## Next steps
Host patterns, header rewrites, and secret substitution in depth.
Take the Agent Proxy to production: placement, deployment methods, and HA.
## 5. Start the agent proxy
On the proxy host, a separate machine in your agent's private network, install the [Infisical CLI](/docs/cli/overview). Or use Docker for the container option below.
Set `INFISICAL_UNIVERSAL_AUTH_CLIENT_ID` and `INFISICAL_UNIVERSAL_AUTH_CLIENT_SECRET` to the Client ID and Client Secret you saved in step 3.
```bash theme={"dark"}
# Authenticate as the proxy identity (from step 3)
export INFISICAL_UNIVERSAL_AUTH_CLIENT_ID=
export INFISICAL_UNIVERSAL_AUTH_CLIENT_SECRET=
```
```bash theme={"dark"}
# Authenticate as the proxy identity (from step 3), pointed at EU Cloud
export INFISICAL_UNIVERSAL_AUTH_CLIENT_ID=
export INFISICAL_UNIVERSAL_AUTH_CLIENT_SECRET=
export INFISICAL_DOMAIN=https://eu.infisical.com
```
```bash theme={"dark"}
# Authenticate as the proxy identity (from step 3), pointed at your instance
export INFISICAL_UNIVERSAL_AUTH_CLIENT_ID=
export INFISICAL_UNIVERSAL_AUTH_CLIENT_SECRET=
export INFISICAL_DOMAIN=https://infisical.your-domain.com
```
The proxy listens on port `17322` by default. Use the CLI or Docker:
```bash theme={"dark"}
infisical secrets agent-proxy start
```
```bash theme={"dark"}
# -e without a value passes through the variables you exported above
docker run -p 17322:17322 \
-e INFISICAL_UNIVERSAL_AUTH_CLIENT_ID \
-e INFISICAL_UNIVERSAL_AUTH_CLIENT_SECRET \
-e INFISICAL_DOMAIN \
infisical/cli:latest secrets agent-proxy start
```
Remember this host's address; the next step points `INFISICAL_AGENT_PROXY_ADDRESS` at it. For production deployment, see [Deployment](/docs/documentation/platform/agent-proxy/deployment).
## 6. Connect your agent
On the agent host, install the [Infisical CLI](/docs/cli/overview); `connect` is a CLI command.
Set the agent's authentication and connection details as environment variables:
```bash theme={"dark"}
# Authenticate as the agent identity (from step 4)
export INFISICAL_UNIVERSAL_AUTH_CLIENT_ID=
export INFISICAL_UNIVERSAL_AUTH_CLIENT_SECRET=
# Scope: your project, plus the environment and folder from step 1
export INFISICAL_PROJECT_ID=
export INFISICAL_ENVIRONMENT=dev
export INFISICAL_SECRET_PATH=/coding-agent
# The agent proxy to route through (from step 5)
export INFISICAL_AGENT_PROXY_ADDRESS=:17322
```
```bash theme={"dark"}
# Authenticate as the agent identity (from step 4), pointed at EU Cloud
export INFISICAL_UNIVERSAL_AUTH_CLIENT_ID=
export INFISICAL_UNIVERSAL_AUTH_CLIENT_SECRET=
export INFISICAL_DOMAIN=https://eu.infisical.com
# Scope: your project, plus the environment and folder from step 1
export INFISICAL_PROJECT_ID=
export INFISICAL_ENVIRONMENT=dev
export INFISICAL_SECRET_PATH=/coding-agent
# The agent proxy to route through (from step 5)
export INFISICAL_AGENT_PROXY_ADDRESS=:17322
```
```bash theme={"dark"}
# Authenticate as the agent identity (from step 4), pointed at your instance
export INFISICAL_UNIVERSAL_AUTH_CLIENT_ID=
export INFISICAL_UNIVERSAL_AUTH_CLIENT_SECRET=
export INFISICAL_DOMAIN=https://infisical.your-domain.com
# Scope: your project, plus the environment and folder from step 1
export INFISICAL_PROJECT_ID=
export INFISICAL_ENVIRONMENT=dev
export INFISICAL_SECRET_PATH=/coding-agent
# The agent proxy to route through (from step 5)
export INFISICAL_AGENT_PROXY_ADDRESS=:17322
```
Launch the agent through `connect`. Everything after `--` is the agent's own command:
```bash theme={"dark"}
infisical secrets agent-proxy connect -- claude
```
```bash theme={"dark"}
infisical secrets agent-proxy connect -- codex
```
```bash theme={"dark"}
infisical secrets agent-proxy connect --
```
The agent starts and behaves exactly as if you had launched it directly; nothing about it looks different. In its environment it finds `GITHUB_TOKEN`, set by `connect` to the fake placeholder, and uses it like a normal token. Its traffic now routes through the proxy: on calls to `api.github.com` the placeholder is swapped for the real token, and everything else passes through untouched. The next step makes that visible.
Every setting here can also be passed as a flag or set in `.infisical.json`. See [Connecting Agents](/docs/documentation/platform/agent-proxy/connecting-agents) for how `connect` works and what it puts in the agent's environment.
## 7. Verify it works
Each method below makes the same `GET /user` call to `api.github.com`. The client sends only the `ghp_…` placeholder that `connect` put in the environment; as the request passes through the proxy, the placeholder is swapped for the real value of your `GITHUB_PAT` secret. GitHub returns your account profile even though the real token never reached the client. That is the whole point: real authenticated work without the caller ever holding the credential.
The agent you launched in step 6 is already brokering. In its session, send:
> Run `gh api user` and show me the output.
[GitHub's `gh` CLI](https://cli.github.com/) reads `GITHUB_TOKEN` from the environment on its own, so the agent needs no token wiring; it just runs the command and GitHub returns your profile. Requires `gh` on the host where the agent runs.
Not driving an interactive agent? Run the check through `connect` directly, in the shell where you set the step 6 variables:
```bash theme={"dark"}
infisical secrets agent-proxy connect -- gh api user
```
`gh` reads `GITHUB_TOKEN` automatically, so there is nothing else to pass. Requires `gh` on the host where you run this.
No `gh`? Any HTTP client works the same way. `curl` sends the placeholder in the header and the proxy swaps it:
```bash theme={"dark"}
infisical secrets agent-proxy connect -- \
sh -c 'curl -sS https://api.github.com/user -H "Authorization: Bearer $GITHUB_TOKEN"'
```
Getting a `401`? The proxy could not apply the credential and forwarded the placeholder unchanged (it does not block the call). Check the proxy's logs, and confirm the agent identity has `Proxy` on the service and the proxy identity has `Read Value` on `GITHUB_PAT`.
## Next steps
Host patterns, header rewrites, and secret substitution in depth.
Take the Agent Proxy to production: placement, deployment methods, and HA.